Are homebrew experiments scientific?

e3ce2-20151107_180604As a professional scientist, I absolutely love any opportunity to meld the art and science of homebrewing. The intersection of chemistry and biology with the senses of taste, smell, touch, and sight creates endless hours of enjoyment. Even more so, I love playing with ingredients and processes to explore this beer landscape.

I’m not alone in this passion for the scientific side of homebrewing, either–two particularly prominent efforts (among others) have a solid hold in our brewing culture. The first of these is Experimental Brewing, by Denny Conn and Drew Beechum. In addition to a great website, they host one of my favorite brewing podcasts. Their mode of experimentation is to recruit IGORs (Independent Groups Of Researchers) who brew parallel batches of beer to test brewing hypotheses. The other major player in the world of homebrew experimentation is Brülosophy. This brewing team regularly investigates single variables (e.g., yeast pitch rate or addition of gelatin finings) of relevance to homebrewers, examining what (if anything) matters for your typical 5-10 gallon batch.

Over the past year or so of following these efforts, I have found some great value and food for thought in all of their experiments. The associated podcasts and blog posts pose interesting questions, and often challenge the received wisdom of homebrew tradition. Yet, the scientific side of me often wonders: Is it really science?

The short answer to this is, in my opinion, both yes and no.

Homebrew experiments are often scientific in that they propose hypotheses, design procedures to test the hypotheses, and collect data for later analysis. This is certainly necessary for science, but it’s not entirely sufficient.

I should preface my explanation on this latter point by saying that my opinions here are not intended as unthinking criticism of some really great homebrew experimentation. I love and appreciate what others are doing. That said, I do notice that the work is sometimes misused or misinterpreted within the broader homebrew culture. Some basic scientific safeguards could help to maximize the value of homebrew experiments and minimize confusion. So, my post is less about breaking down the current “system” (if it even really is a system) and more about what we can add to improve the value of homebrew experiments. Even more so, it’s about how those of us who read the “exbeeriments” should interpret them!

  • Expand the brewing scenariosAs is readily acknowledged by most brewing experiment writers, results of a particular experiment are really only applicable to those experimental conditions. For instance, if you find that there is no difference between a 20 minute and a 60 minute boil for a stout, the results probably shouldn’t be extended to a blonde ale. More experiments at a homebrew scale are needed!
  • Emphasize limitations. This follows pretty logically from the point immediately above. I think that most of the brewing experiment write-ups out there do this pretty well, so it’s more of a caution for those who read and try to apply the results.
  • Record methodology in detail. Brülosophy sets a high bar for this, and is able to do so because their brewing is done typically by a single person. The IGORs do good work, but the distributed nature of the brewing means that a lot of the details on their brewing setups and techniques aren’t immediately available. Different brewers often have very different techniques. Unfortunately, this can raise a lot of basic questions about experimental results and interpretation. Experimental Brewing did a great episode highlighting differences between brewers’ techniques and how it affected an experiment related to bitterness. This was indeed illuminating!
  • Pair sensory perception analysis with laboratory analysis. The aforementioned Experimental Brewing episode did this really well, in terms of evaluating differences in IBU yields across different recipes and setups, as did a Brülosophy exbeeriment related to loose vs. bagged hops in the kettle. This approach really helps to nail down the interpretation of results (especially for those related to bitterness), although I also admit it is potentially expensive.
  • Engagement with the brewing literature. There is an ocean of literature from the commercial brewing world, much of it published in formal scientific journals, yet this is rarely if ever incorporated into the homebrew world in any meaningful way. There are reasons for this, of course…for instance, much of this literature pertains to giant commercial brewing setups and cannot be transferred confidently to the homebrew scale. Also, much of the literature is technical and paywalled, so might as well not exist for most hobbyists.
  • Peer review and formal publication. Is it time for a Journal of Homebrewing Science? If there is a single thing that would improve homebrew experiments, it would be formal, independent peer review and a mechanism for publication of these reviewed results. Comments on blog posts do provide one form of review, but this is not always reflected by modifications in the experiments or changes in interpretation of the experiments. If I were to be really ornery, and I suppose I am because I am writing this post, I would suggest a multi-step peer review process handled by an independent review or editorial board for brewing experiments.
    • Design the experiment, and open it up for input.
    • Modify the experimental design as required.
    • Run the experiment.
    • Write up the results, and open the write-up for review.
    • Following the review, revise the write-up accordingly.

Overall, I love the experimental approach to homebrewing. I think it illuminates some really interesting facets of our hobby, and helps brewers to be more and more thoughtful in their technique. We’re now at the stage where we can push things to the next level–so let’s do it!
Beer Tasting: Palaeotis Pils

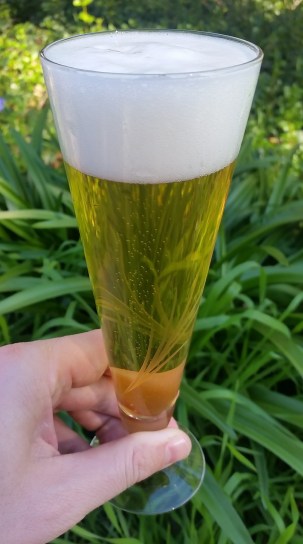
20170128_124227My Palaeotis Pils, falling within the German pils style, has been on tap for a few weeks now, and seems to be reaching a peak in quality. Time for a tasting!

  • The Basics
    • Original gravity = 1.048, final gravity = 1.011, abv = 5.0%, estimated IBU = 34
  • Appearance
    • Pale straw appearance, brilliantly clear, with a tall, fine, white head that settles to a persistent blanket across the top of the beer.
  • Aroma
    • A very gentle malty sweetness with a spicy hop note behind that.
  • Flavor
    • Bready malt profile, with a firm bitterness that lingers after each sip. It’s definitely a bitter beer, but not out of balance for what I wanted.
  • Mouthfeel
    • Carbonation is appropriately high for the style, and it has a crisp, medium-dry finish.
  • Would I brew this again?
    • Absolutely! This is an exceptionally nice beer; it nails pretty much every point of the style, and is easy drinking, too. German pils is probably a little hoppier than I would always want in a pale lager, but that’s more of a stylistic thing than a flaw in this particular recipe. The other night, I ordered a glass of Bitburger, often considered a “classic” German pils. Although I didn’t taste them side-by-side, I can say that mine hits many of the same notes as this commercial example. I have my pils entered in an upcoming competition, so we’ll see how my assessment compares to that of the BJCP judges.
  • Overall
    • 10/10

What I Wish I Knew When I Started Extract Brewing

a5e74-20150515_223348Nowadays, I’m mostly an all-grain brewer. But, like many brewers, I started out using malt extract, perfecting basic fermentation, sanitation, and packaging techniques that I still apply. I wasn’t always happy with the results, and like many people “blamed” it on malt extracts. Additional experience and some distance in time, though, make me realize many of the problems were the result of faulty techniques, not faulty ingredients. So, I put together this brief list of suggestions to help out other extract brewers, particularly those who don’t have time, space, or money to create an all-grain setup.

  • Read the ingredients list. Most malt extract manufacturers provide stats on their product, including details on the grains that went into producing the particular extract. Think carefully about what you’re putting into your beer–are you unintentionally using an inappropriate extract for your recipe? For instance, some amber extracts might use a significant chunk of Munich malt. This is great for some styles, but might give you an unexpected flavor for others. On a related note…
  • For most beers, use the lightest extract available, and build up from there with steeping grains. When I started brewing, I thought, “Oh, I’ll use the stuff labeled as ‘amber DME’ to make an amber ale! And add a few other grains to improve the complexity.” This was a mistake! I mean, the result wasn’t bad necessarily, but it wasn’t as good as it could have been. I didn’t think about what was in the DME, and as a result I added some unnecessary grains and ended up with a slightly muddled product. One way around this is to start with a very simple light extract, and then build up using crystal malts and other ingredients to get the result you want.
  • Avoid overly concentrated boils. If you are doing a partial volume boil, adding all of the extract at the start can result in lower-than-expected hop utilization (due to the relationship between bitterness and wort specific gravity) or some funky twang. One strategy is to add a certain amount of extract at the beginning of the boil, and then add the rest for a few minutes at the end, before chilling, transferring to the fermenter, and diluting.
  • Don’t bother with liquid malt extract unless you absolutely have to. In my experience, it’s harder to handle, is rather messy, and the container is difficult to clean out. Dry malt extract ain’t perfect, but for me at least it’s easier to get into the brew kettle. Additional comment added after publication: Dry malt extract also is way easier to measure and store with if you have “odd” amounts–e.g., it is way easier to save a half bag of DME than it is to save a half container of LME.
  • Don’t mess with the water too much. Water chemistry can be important, but your extract batch will include the minerals that were in the malt extract as well as the minerals with whatever water you are using to reconstitute the extract. If you add too much, you can end up with an overmineralized mess! I would recommend careful experimentation over a few batches to see what works best, erring on the side of “less is more”. Or, you might try contacting the maltster to see if they can tell you a little more about the water used in their extract production process.
  • Don’t fear the mini-mash. It sounds complicated, but it isn’t nearly that bad (especially after you’ve had a few other batches under your belt). And, it adds a whole host of new possibilities to your recipes! You can easily do it in your kettle with a small steeping bag–no mash tun required. Don’t feel like doing a mini-mash? Don’t worry! You can brew a whole ton of stuff (including most IPA’s, porters, stouts, blonde ales, and the like) with just extract and steeping grains.
  • Fermentation temperature control matters. Perhaps 75% of the time, issues that people blame on extract brewing are actually the result of poor temperature control (the remainder are either due to poor sanitation or poor extract technique). If your beer rises to 80 degrees while fermenting, it’s going to develop some off-flavors, no matter how you derive your wort. It’s fair to say more all-grain brewers have temperature control, and hence the perception that all-grain brewing methods result in better beer. A freezer or refrigerator with a temperature controller unit is easiest (but also most expensive and most space-hogging), but workable alternatives exist.

I plan to brew up an extract batch in the near future–it’s been quite awhile since I’ve done one, and it seems like a good idea to try out these techniques again!

Equipment Review: Mash Paddle by Abbey Cat Brewing

My wife got me a mash paddle for Christmas! I had a nice plastic brewing spoon already, and awhile back I had also purchased a plastic mash paddle. The spoon is great, but the plastic mash paddle was fairly worthless. It had a little too much flexibility and was just a little too small to be effective in breaking up dough balls or stirring decoctions. As a result, my arms would be quite sore after even a brief decoction, so I mainly just ended up using the plastic spoon. A new, sturdier mash paddle was a welcome addition to my brew house.

20161228_164521

This particular mash paddle was made by Abbey Cat Brewing–it’s their 36″ maple version. The construction is high quality–there is a beautiful grain on the wood, the piece is shaped nicely, and all of the edges were cleanly sanded. This particular version has my brewery name engraved into it, which is a nice touch.

I’ve used the paddle for a few batches now, on tasks including dough-in, stirring of the mash, and decoction stirring. The paddle works pretty much as advertised, and is head-and-shoulders above my old plastic paddle. I could probably have gotten away with the smaller (24″) version, but overall it’s probably better to have a paddle that’s too big than too small. When it comes to decoctions, the paddle is way easier to work with than my spoon, too. It moves more of the decoction around, with less effort. Clean-up is easy, too — just a quick rinse and I’m done!

So, I give this piece of equipment a solid A, for quality of construction and utility. I’d recommend it for anyone who is doing regular all-grain brewing, and say it is a “must have” for anyone doing decoctions.

Mash paddle in action for a decoction

Mash paddle in action for a decoction

First Amendment Blonde Ale

This batch is a slight rework of my favorite blonde ale recipe. I upped the base malt a slight bit, and have switched to just Warrior as a bittering addition. I recently bought a pound of the stuff–my intention is to use it for the bulk of my bittering additions in various recipes going forward. Warrior’s bittering properties are supposed to be fairly gentle (attributed to its low cohumulone values), so I figured I would try it out as an alternative to some other hopping strategies I have used in the past.

The name honors the Women’s Marches that took place across the country on the day I brewed this (I was there with my family at the Los Angeles one)–and of course, it honors all who peacefully and proudly exert their constitutional rights, regardless of where they fall on the political spectrum.

Overall, I was quite pleased with how the brew session went. Other than a high-than-expected efficiency (which is not the worst thing on the planet), I hit my temperatures and brew numbers quite effectively.

First Amendment Blonde Ale

  • 9.5 lbs. 2-row brewer’s malt (California Select, Great Western Malting Co.)
  • 0.5 lb. 20° caramel malt (Briess)
  • 0.4 oz. Warrior hop pellets (15.8% alpha), 60 minute boil
  • 1 Whirlfloc table, 10 minute boil
  • 1 tsp. Fermax yeast nutrient, 10 minute boil
  • 1 pkg. California Ale yeast (WLP001, White Labs)

Target Parameters

  • 152° mash, 60 minutes
  • 1.051 o.g., 1.011 f.g., 5.2% abv, 24 IBU, 5 SRM, 5.5 gallons into the fermenter

Procedure

  • Three days in advance, I made a 1.5L starter. It ran on the stir plate for two days, before I split it up and cold-crashed it. I set aside 0.64L for another batch, and the remainder will be used in this batch.
  • I built up my water from RO for this batch, adding all of the minerals to the strike water (3.375 gallons). I used 4.9g gypsum, 0.9g epsom salts, and 4.6g calcium chloride. I also added 2 tsp. of phosphoric acid (10% concentration), to acidify the mash. The final target brewing water profile will be 75 ppm Ca, 100 ppm S04, and 75 ppm Cl. This profile, based on one in the Palmer and Kaminski water book, will hopefully avoid the “flabby” taste I have been getting in my blonde ales brewed with local tap water.
  • I warmed up my mash tun with 3.375 gallons of water at 170°. Once it hit 164°, I added the grains, to hit my target mash temperature of 152° on the dot.
  • I mashed for 60 minutes. I checked the pH, and it was around 5.4.
  • After 60 minutes, I added 1.3 gallons of water at 185°, let it sit for 10 minutes, vorlaufed, and collected the first runnings.
  • Next, I added 3.5 gallons of water at 185°, let it sit for 10 minutes, vorlaufed, and collected the second runnings.
  • I total, I collected 6.8 gallons of wort with a gravity of 1.044–82% efficiency! I’ll aim for a lower boil in order to ensure I don’t overshoot my target gravity.
  • Once I brought the brew to a boil, I added the hop pellets in a bag and boiled for 60 minutes, adding the Whirlfloc and Fermax with 10 minutes to go.
  • After 60 minutes of boiling, I chilled the wort to 70°, transferred to the fermenter while aerating, pitched the yeast, and sealed it up.
  • I brewed this beer on 21 January 2017. Starting gravity was 1.051, precisely on target. I plan to ferment this batch at 66°.