I have been brewing many more small (2.5 to 3 gallon) batches lately. It’s a great way to test out new styles–if I don’t like it I’m not stuck with 5 gallons. This has long been my favored format with high gravity beer, too; I don’t necessarily want 5 gallons of a 10% abv brew. I can manage well in my Anvil Foundry 10.5, but it’s a bit of a pain to navigate at smaller batches. The volumetric markings don’t go low enough to measure quickly, and a small mash can end up pretty thick within the brew basket. So, I decided that it was time to splurge a bit and add the Foundry 6.5 to my brewing setup. It is designed for smaller volumes, while also carrying over features like 220v brewing.
The form factor on the Foundry 6.5 is best described as “adorable.” It’s super compact and really easy to handle and clean compared to the Foundry 10.5. It was nice that I could reach so easily to the bottom on this one, which made the already easy cleanup on the Foundry a breeze.
Running at 220v, heating speeds were zippy, and the boil was vigorous. I had to turn it down to around 72% power to avoid too much loss to evaporation. My pump, which I also use with the 10.5 also, works great with the 6.5. The one change is that I had to use tubing of slightly different lengths; a mild annoyance, but at least I didn’t have to buy new tubes. I really like that I didn’t have to buy another recirculation kit.
With smaller batch volumes, I’ve noted that my brew days are definitely shorter; perhaps around 4 hours start to finish versus 5 hours with the 10.5. I could make it a bit shorter if I had colder water for the chiller, but it definitely feels like a more compact brew day overall.
In short, I’ve been having fun with this. The Foundry 10.5 does a great job for 5 gallon batches, but the 6.5 can’t be beat for 2.5 or 3 gallon batches! If you are planning to do only small gallon brews, or you want to extend your brew capabilities, the Anvil Foundry 6.5 has my enthusiastic endorsement.
When it comes to hops, I am often a creature of habit. I love Cascade, Centennial, Citra, and Simcoe for my IPAs, and I’ll sometimes throw in Galaxy or Amarillo. I love Saaz, Hallertauer, and their American equivalents for my German beers. And…I don’t get much outside of that box very often. With a bewildering array of hops on the market for homebrewers, I just get overwhelmed and usually stick with what I know.
Now, that philosophy can be great for consistency and predictability. It also helps me to avoid chasing the latest expensive fad hop, and I’ve really gotten to know the flavors in each familiar variety. That said, I’m almost certainly missing out on some real gems. But, how can I break out of my rut, without too much effort on researching and such?
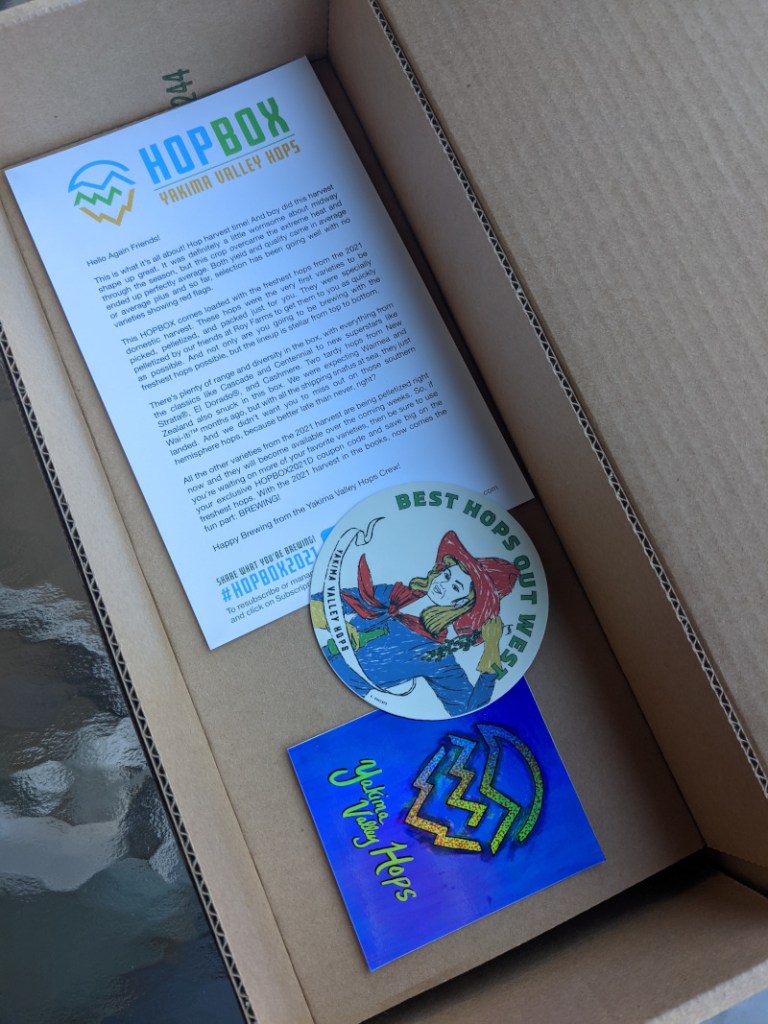
About two months ago, I was super excited to learn about a hop subscription box from Yakima Valley Hops, called The HOPBOX. HOPBOX was totally sold out then, but one of their reps said to check back at a certain date, and I should be good to go. Sure enough, I visited the website a few weeks later and I could order! (thanks for the tip, YVH rep!) I signed up for a full year (which came with a 15% discount), and waited for my first shipment…
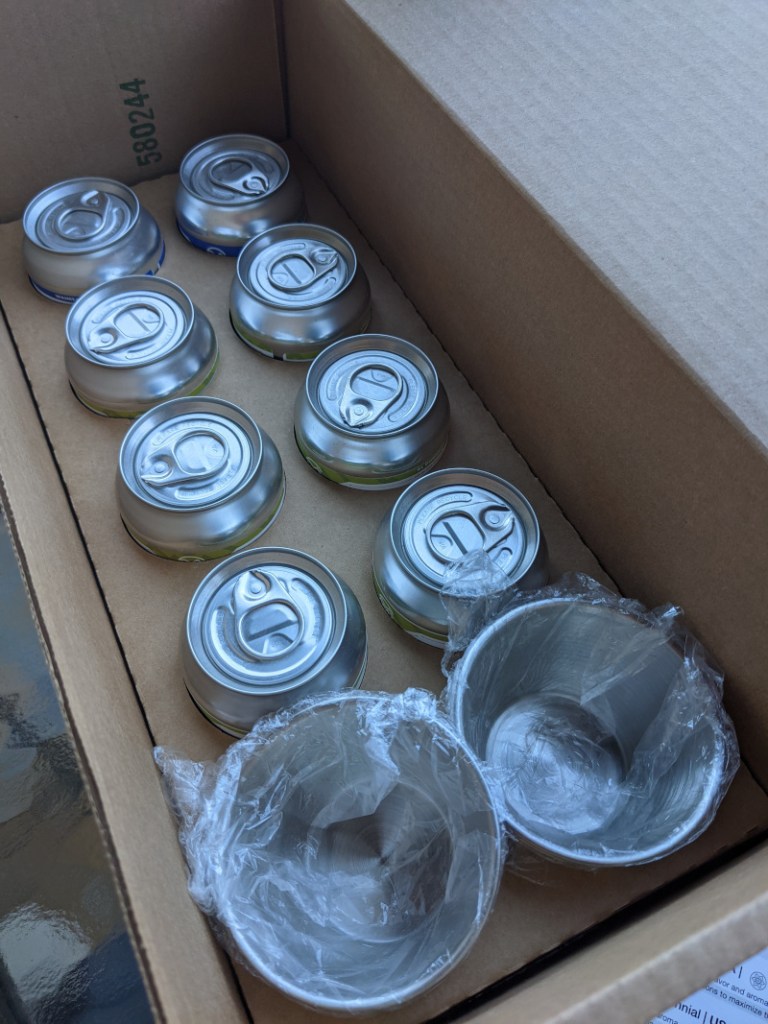
A little over a week ago, a very attractive box landed in my mailbox. Opening it up, I saw eight 2-oz. cans of eight different hop varieties, along with some stickers, a card describing the hops, and a set of stainless steel cups to portion out hop additions.
So, what do I think about all of this? Let’s take a look! (note: I paid for this myself, and did not receive any compensation for the review, so I feel I can be reasonably even-handed)
The Hops
I was pretty impressed by the hops! All were from the 2021 crop, so I have no doubt on freshness. High marks there.
I am also impressed by the varieties–this box included Bravo, Cashmere, Cascade, Centennial, El Dorado, Strata, Waimea, and Wai-iti. A few are ridiculously expensive to buy at some suppliers (e.g., Strata sells at over $2.50 per ounce at some online stores), and others aren’t yet available for this crop via YCH (e.g., Cashmere and El Dorado).
For my brewing habits, this is a perfect quantity of hops. There are enough to do a few beers with fun blends–for instance, my first batch uses Bravo as the bittering with Waimea+Wai-iti+Cashmere for the whirlpool and dry hop. There isn’t enough of each for a five gallon SMaSH beer, but I think I’m okay with that. I can always go back and try a particularly intriguing variety in more depth. For me, Waimea is the standout in my current package so far, and I may well come back to that.
I like that this box fits within a general theme, of “hops that are good for IPAs and pale ales”. That made it a lot easier to plan brewing, versus if I had gotten a smattering of hops suited for disparate styles.
One thing that might have been nice is access to detailed data on individual lots. The packages had alpha acids, etc., but I wouldn’t complain if there were specifics on particular hop oil quantities, etc. That is a very minor quibble, though.
The Extras
This box came with two stickers as well as a set of stainless steel cups to portion out hops. I’m not really a sticker person, so those were somewhat of a wash, but the cups have already gotten use in my brewery. Previously I have been using reusable plastic containers, which are OK but a bit large for what I need. The little stainless steel containers (the same as 4 oz. sauce cups you might get at a restaurant) are branded with the YVH logo and will fit 3 oz. of hops fairly comfortably. The cups also make it easy to weigh out an ounce at a time, or a measure mineral additions.
One extra I might suggest for future boxes would be to include variety-specific recipes for the hops. I of course had fun thinking up something on my own, but at the very least a starting point would be helpful.
The Packaging
Yakima Valley Hops uses a nitrogen-flushed pull-top can, which is pretty slick. There’s no doubt as to the fact that they’re sealed and pretty impermeable to oxygen. A minor beef is that they are a little less convenient to store compactly in my deep freezer than bags are, and the cans also tend to wrinkle slightly due to the contraction of the internal gases at freezer temperatures. That said, they’re quite visually attractive.
The box itself was nicely arranged, and it was enjoyable to open and see what all was inside. I personally find unboxing videos or excessive commentary on such things a bit over the top, but I can’t deny that I had fun.
The box/packaging itself are maybe a little big for what’s inside, but it is all cardboard and recyclable, so I give them high marks for that. There’s no excess plastic junk, or unrecyclable bits. Also, everything arrived in perfect shape.
The Cost
Because I ponied up for a one year (four box) subscription, this knocked 15% off the $40 price tag per box, so I’m paying $34/box. And, shipping is free! Is that worth it? Overall, I think yes.
For comparison, I priced out 2 oz. containers of each hop on the Yakima Valley Hops website. This adds up to about $18.50 of hops and $9.70 of shipping, for $28.20 total. I will note, though, that some of the things in my box are currently sold out or only available in 2020 or 2019 crop years. When I compared with MoreBeer, you’d spend around $31.42 and then an additional $8 or $10 for shipping, and you wouldn’t necessarily get as much control over which year you got.
In pricing out the stainless steel cups, it looks like they run around 50 cents to $1 each online; just for the sake of argument, let’s say $1 each (they have printing on the outside, after all). So, that’s $6 value there, more or less.
With everything included ($28.20 of hops and $6 of steel cups), and free shipping, I would say this box is about a break-even proposition, and you definitely come out ahead versus if you had to pay shipping. The exclusive access to some hops is also a nice perk. Overall, the box is also a fairly good value versus buying each individually at a reseller. However, the box wouldn’t necessarily be a good value at full price ($40).
Overall
On the whole, I rate the HOPBOX a 4 out of 5, and it comes awfully close to being 5 out of 5. The cost for what you get is pretty good, although not a ridiculous steal. The full-price one-off box might make for a good gift for someone, but if you brew a lot and are likely to use the hops, I would just get a full-year subscription to save a fair bit of money. The hop selection is top-notch, and the extras in the box are pretty cool. Additionally, at least this first box has definitely helped me to expand my brewing horizons, so mission accomplished! I definitely recommend this if you are a hophead or know someone who is.
After considering a multitude of factors, I recently decided to check out an electric brewing system. I wanted the ability to more easily do step mashes, as well as the ability to recirculate my mash for better clarity. Finally, I was ready to be done with propane refills (especially during the days of coronavirus, with the possibility of variable supplies and variable masking behavior out “in the wild”).
Following a week or two of research, I settled on the Anvil Foundry 10.5 gallon brewing system. First, the cost (<$500 for the version with pump) seemed fairly reasonable, and the reviews for quality and reliability were solid. The heating element was particularly well rated, and had high marks for excellent heating plus minimal risk of scorching. The ability to switch between 120 and 240 voltage was also a plus in the long-term. Even though I’m limited to 120 for the time being, I like the idea of having the option open. The final selling point for me was that the controls are supposed to be dead-simple and all on-board the unit, rather than hiding behind a Bluetooth-connected Android app. I want a system that will still work after I upgrade my phone, or when my wifi is down, or if the unit’s software is “helpfully” updated.
Luckily, I managed to buy direct from Anvil on a 10% discount sale, and they had free shipping! It took about two weeks for the setup to arrive, and I eagerly unboxed it as soon as it hit my doorstep.
In terms of options, I got the recirculation pump kit, along with the small-batch adapter. I normally work with 5 gallon batches, and don’t see that changing in the future, but I do occasionally want to brew 2.5 or 3 gallon batches. The steel insert to adapt for small batches is supposed to improve efficiency in that case, by preventing recirculated mash runnings from just flowing over the top of the grain bed, rather than through it.
Hands-On Review
At this writing, I’ve brewed seven batches with the system. This includes 5 gallon batches of a German pils, American IPA, Dortmunder Export, Scottish export ale, and stout, as well as a 3 gallon batch each of a moderate-strength winter ale and an imperial IPA. This review will be based on that experience, with the caveat that I’m still learning the system.
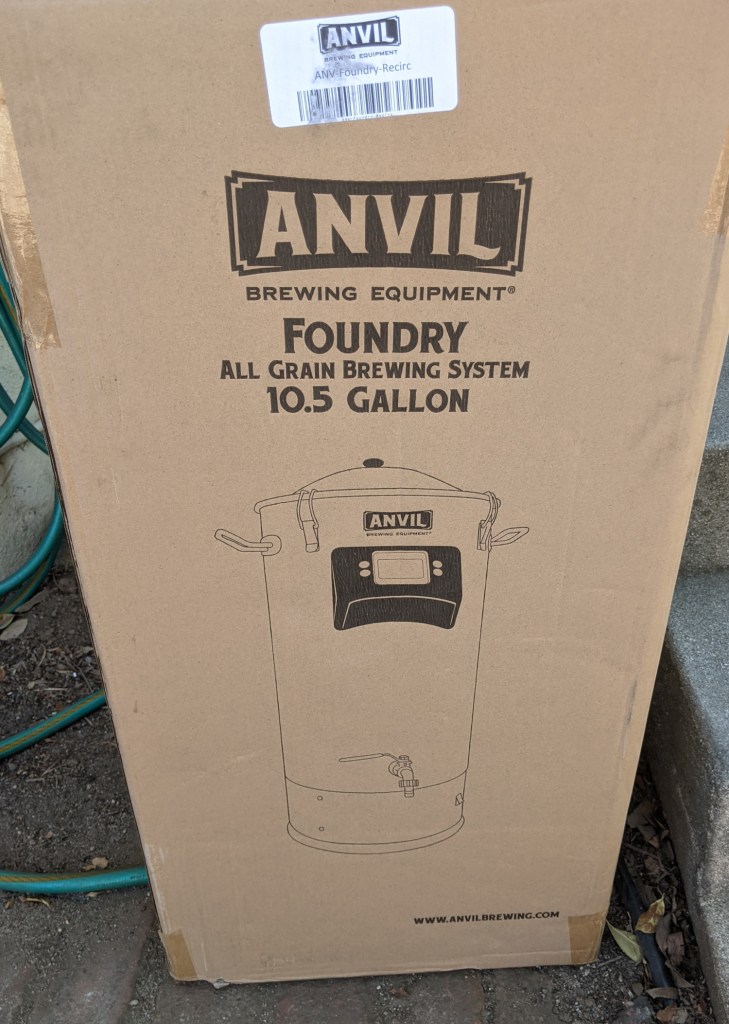
Unboxing
That’s one big box.
This system is a snap to unbox and set up. The packaging was super sturdy, but also easy to open up. I didn’t do it all in one sitting, but I would estimate it took about an hour to pull out all of the pieces, do the minor bits of assembly, and clean the equipment prior to brewing. I filled up the rig with PBW and ran a test of the pump, followed by a quick rinse with hot water. The goal was to clean off any manufacturing oil, and have it all ready for brew day.
Foundry in Action
For my first brew on the Foundry, I went with a German pils using a step mash. I figured this would help me to explore some of the features of the system, while also producing a tasty beer!
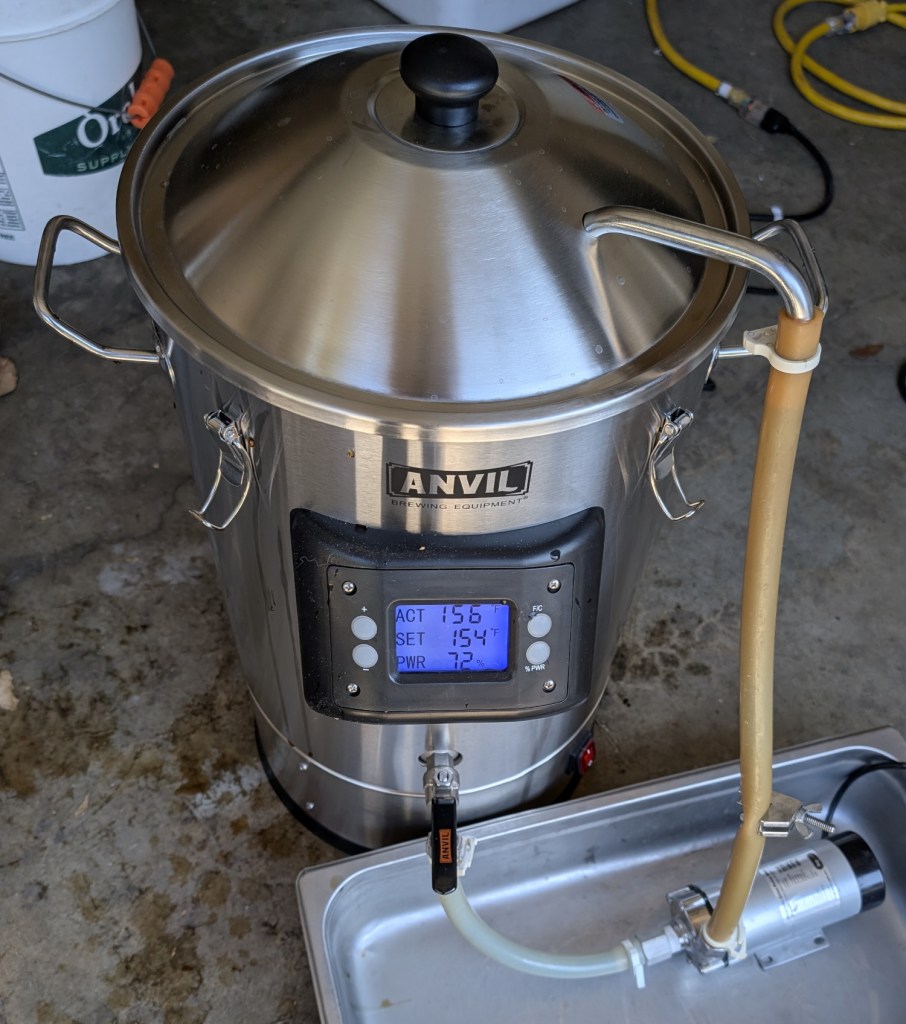
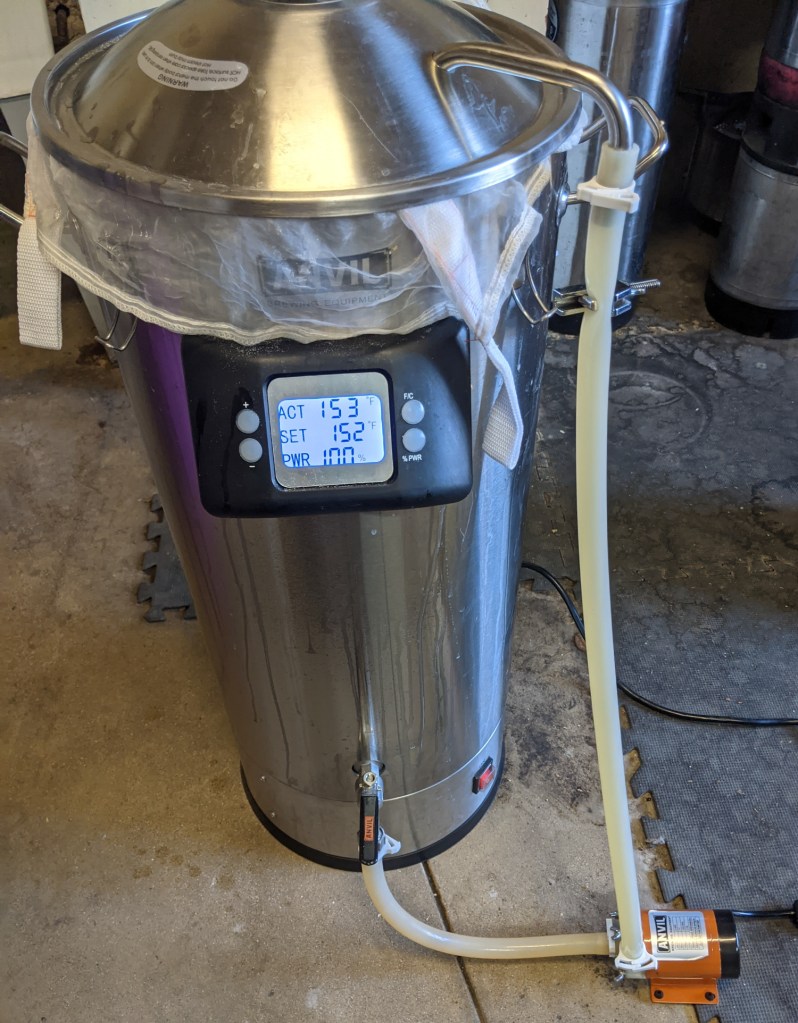
This recipe required around 7 gallons of water. My usual procedure is to use hot tap water, to save on time and energy. Starting at around 115°, it took about 30 minutes to reach my strike temperature of 146° and a mash temperature of 142°. After a 60 minute mash at this temperature, I then raised the mash to a temperature of 158°, which took around 20 minutes. I started off with 75% power, but realized I should just up it to 100% to move things along more quickly. I then notched in back to 75% when the temperature was achieved. Finally, it took about seven minutes at 100% power to get up to the mash-out temperature of 168°. This is in the ballpark of roughly a minute per degree of temperature increase that I’ve seen cited elsewhere.
Recirculation was pretty easy and intuitive. The pump worked well, and I didn’t have any clogging issues. The one minor change I made is that I decided not to use the perforated metal disk that’s supposed to cascade the returning mash runnings across the top of the mash. That just seems like a recipe for hot-side aeration. Now, I’m not a low-oxygen zealot, but I do try to minimize splashing. 45 to 60 minutes of continual splashing is a risk I didn’t want to take. So, I ran a length of tubing from the return pipe directly onto the top of the mash. I had minor concerns about channeling, but I figured that the slow rate of return on the liquid minimized that risk. For my latest batch, I added a nylon t-junction to spit the wort out in two different directions (see picture towards the end of this post). I’m going to keep playing with this aspect of the system, because I do think the factory standard metal plate is a bit overly complicated. I suspect that as long as you’re not shooting a jet of runnings straight into the grain bed, you’re probably going to avoid channeling.
After removing the mashed grains, it took 50 minutes to bring the kettle to a boil at 100 percent power. I noted that it was boiling before the panel actually showed 212 degrees. As I read up on this online, it seems to be a known “quirk” of the Foundry that the thermometer is calibrated well for mash temperatures, but not at the limits of boiling. This isn’t a huge issue in my book, but good to know.
I recirculated during chilling, both to speed up the process as well as to sanitize the pump for transfer to the fermenter. As before, I used a silicone hose to return the wort below the surface of the liquid, preventing aeration. As many have done before me, I am going to replace the hoses on the chiller–they’re a bit flimsy, and don’t do well if they get too hot.
Transfer to the fermenter is a cinch using the pump. One thing I learned is to plan to throw out the first cup or two of wort, because it often will have a ton of trub. After that, it ran pretty clear.
Cleaning isn’t too bad, and I have honed my process after a few batches. First, I have to get rid of the dregs of the wort–unfortunately, this most easily involves picking up the unit and tipping it into the sink. Thankfully it’s not too heavy. I do a quick rinse next, and then fill up the kettle with PBW and hot water. I put in all of the equipment bits I want to clean, including the grain basket, and then recirculate with the pump. I pump the solution out, spray things down with hot water and pump that out too, and the repeat the hot water rinse. Done and done on the cleaning!
The “Like List”
The controls are dead-simple, and pretty intuitive. After the first batch, I had all of that under control!
This unit seems solidly built, but it’s not overly bulky. When empty, it’s pretty easy to move around.
The pump kit makes transfer and recirculation a snap. I really, really, really, advise getting the mash recirculation kit with pump, or else rig up your own equivalent.
Along the same lines, the pump itself is simple to disassemble and clean.
This unit is pretty easy to clean, especially if you have a stock of PBW. If you do a lot of brewing, I highly recommend getting a 5 gallon bucket of the stuff!
It’s really nice to be able to do step mashes with little extra effort.
As I get into the rhythm of a single kettle brewing system, I’m really enjoying the simplicity. There’s still stuff to do, of course, but it has been nice to pare back things like the mash tun, propane burner, etc.
I used the delay timer to heat up the water for my most recent batch, and quite like it.
The “Caution List”
The gasket on the lid comes off super easy, and is a big pain to get into place. Because I’m not distilling with this unit, I have just left the gasket off.
It’s easy to tiptoe to the edge of danger if the hardware on the out port isn’t fully tightened (or is overtightened). The various nuts and gaskets should be checked carefully before every brew session.
The temperature readout is not terribly accurate when you’re out of mash temperature range (as noted above). Also, when you’re not recirculating, the temperature reading may not match well what is going on in the rest of the mash.
Don’t press down on the grain basket (e.g., to squeeze the grains) when you have it resting on the kettle insert. The insert will come loose pretty easily under excess pressure, so if you need to squeeze you should just put the grain basket into a separate container. After the main drain is done, I put it in one of my old brew kettles for the final drain (and squeeze if necessary).
The default hoses on the chiller are fairly cheap vinyl, and will warp really easily if you’re not careful around the hot kettle. I’m swapping mine out, because I already had to cut and reattach the factory standard ones when they got a little too close to the kettle during a small batch brew.
I wish the switch on the pump was just a little farther from the motor itself. From a safety standpoint, the switch is prone to sitting on the floor, and thus sitting in any spilled liquids.
5 gallon batches of high gravity beer are not a great match for this system, unless you use extract, reiterated mashes, or some other process. That said, this is a non-issue for me, because A) I rarely brew beers over 1.065 starting gravity; and B) when I do, it’s typically in 2 or 3 gallon batch sizes.
Andy’s Anvil Hacks, Tips, and Tricks
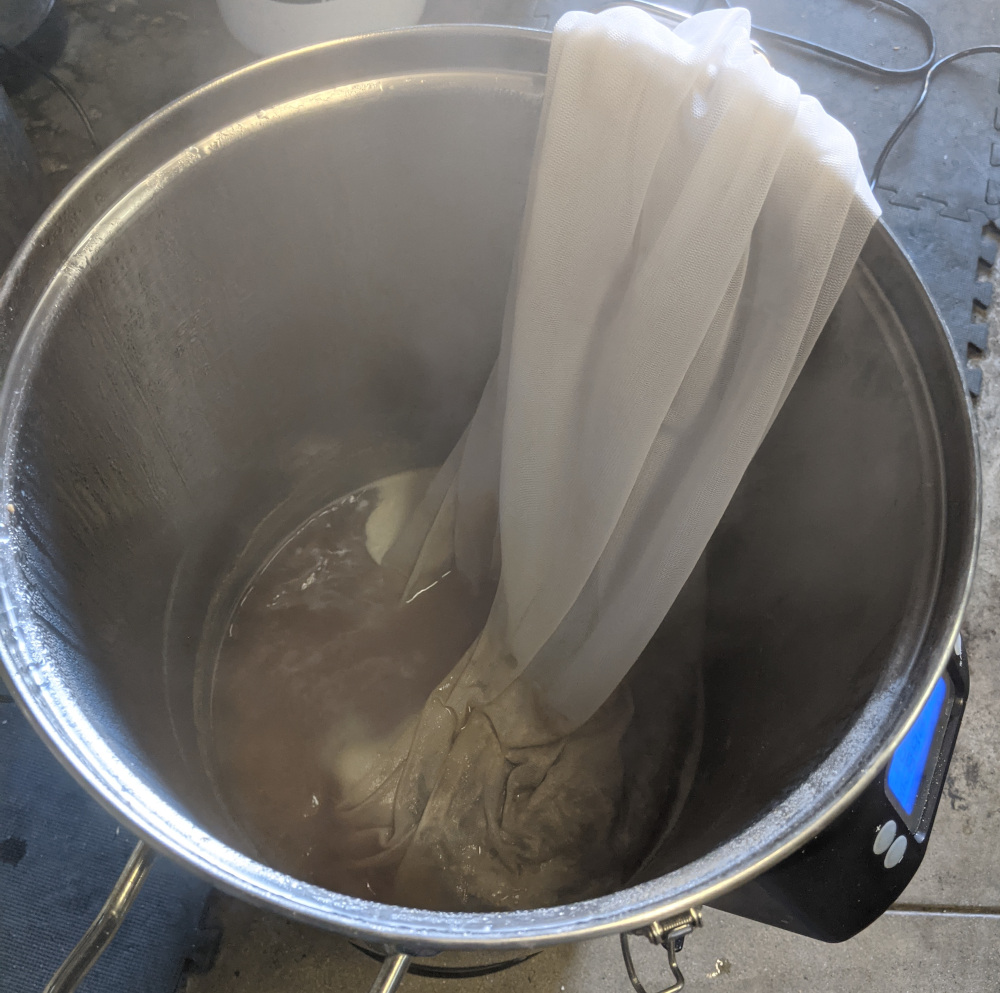
My bagged hop technique
How to handle hops? I’ve tried a few methods already, and settled on using a big bag setting in the kettle (see photo). I drape it over the side, and it is easy enough to open up and toss more hops in without handling boiling liquids. Loose pellet hops work okay if you have a relatively small rate of hopping, but I won’t even try it with whole cones. They’re just too likely to clog the outlet and/or pump. Individual bagged hop doses thrown into the kettle work okay also, but you absolutely have to remove them before chilling / hop whirlpooling with pump / transfer to fermenter, because once again they tend to clog up the out port. I decided against a hop spider, because mine isn’t quite tall enough to work well with most batches, and because it would be a pain to deal with when putting the chiller into the relatively narrow kettle.
This “hack” isn’t mine by any means, but I do recommend using a good fine-mesh brew bag inside the malt pipe during the mash. It makes clean-up of the pipe soooo much easier, and the bag itself is a snap to clean, too. This also means you can crush finer, and get correspondingly better efficiencies. Binder clips will effectively hold it in place against the brew pot.
To save heating time, I use hot water out of the tap, rather than heating from ground temperature. Your mileage may vary, depending on the quality of water out of your heater, but it can shave off a fair bit of time.
GFCI, GFCI, GFCI! Because we’re talking about lots of liquids moving around near power cords, with various points of leakage and failure, it’s critical to have your electrical safety in hand. If you don’t have a GFCI outlet (quite possible in some older garages and homes), either get one wired in by a competent electrician or else get one of the in-line GFCI cords.
I am getting one of those stainless steel food service trays to hold the pump when it’s in use during brew day. There tends to be a bit of leakage of wort when disconnecting the hoses (up to a cup or so, if I’m not careful), which makes a mess on the floor.
I’m going to put some clear silicone sealant around the edges of the control panel, as recommended by multiple people to prevent accidental moisture incursion. I waited for a few batches (just in case there was any immediate reason that I needed to send back the unit, before I go adding caulk).
The small batch adapter probably isn’t necessary for high gravity beers, where the grain still fills to a point well above the perforations on the grain basket. On my next high gravity small batch, I’m going to try without and see how things go, although I’m still going to use it on lower gravity small batches.
As mentioned above and shown in the photo below, I’ve modified the recirculation return system to reduce splashing.
If you are on Facebook, the Anvil Foundry All-Grain Group is pretty fantastic! I highly recommend joining if you are on that social media platform. Their Unofficial Anvil Foundry Bible is essential reading, and provides a ton of helpful tips, work-arounds, and mods.
My modified recirculation return, in place of the metal plate. A hose attaches to the steel return arm, and a t-junction sends the liquid in two different directions. When the kettle lid is in place, the t-junction is just below the top of the mash, removing the problem of excessive splashing.
Anvil Foundry versus my “Standard” System
Up to this point, my primary brewing setup used a 10 gallon cooler mash tun and batch sparging with a 10 gallon brew kettle on a propane burner. I feel like I can do fairly similar things on them, although the process is pretty different.
Somewhat surprisingly, the total brew time (from filling the kettle with water to finishing clean-up) is about the same for my two methods. The mash process feels a bit quicker and easier on the Foundry, because I don’t mess around with sparge water (although some people do, for the extra mash efficiency points). The Foundry might take a bit of extra time to heat to a boil, but I can also save some time on heating by filling the kettle the night before and having it at strike temperature when I wake up in the morning of brew day.
Because of the pump and stuff, as well as the depth of the Foundry kettle and the various nooks and crannies of the grain basket, cleaning is maybe a touch more work with this system versus my old one. I’ve got a rhythm down finally, and much of the extra time is just letting the cleaners do their thing. That said, spent grain cleanup is easier for me with the Foundry versus my mash tun cooler.
The biggest adjustment point for me has been mash efficiency. I pretty consistently hit 75% measured mash efficiency (as calculated in BeerSmith) on my old setup, and am now at around 68% mash efficiency on the Anvil. I’m okay with this (especially because I’m not sparging), although it took some iterations with grain crush and such to get here. My only real annoyance is that I’ll have to adjust all of my old recipes accordingly! But, that’s not the end of the world. I feel like I’m going to be able to more consistently hit efficiency expectations, too, because there are fewer steps in my new process.
A major point in favor of the Foundry is its simplicity. My “traditional” setup requires a propane burner, propane tank, mash tun, hot water pot, and boiling kettle, along with the other bits and pieces. The Foundry is just more compact! The entire process takes place in the main kettle, pump, and grain basket, more or less. As mentioned above, it’s nice to not have to worry about propane refills from both a cost and convenience standpoint.
Overall, I’m not going to ditch my old system, but the Foundry is going to be my primary brewing rig from this point on.
Overall Assessment
The Anvil Foundry 10.5 is a really nice piece of equipment. It’s well-built, the controls are intuitive, and the unit has a great price point. As with any specialized brew hardwear, there are a few minor quirks, but they truly are pretty minor and easily worked around. The compact nature of the system is nice, and has simplified my brew day. So far, I have no regrets for this purchase! If you’re looking to go electric, definitely check out the Foundry.