Alta California Lager

It’s late spring in California…theoretically, this should be a warm time of the year. A few months back, I wanted to have a clear, clean, tasty Mexican-style lager on hand for the anticipated afternoons out on the patio. It’s ended up being a cooler and rainier stretch than I expected, but that hasn’t hampered my enjoyment of this beer.

I’ve never brewed a Mexican-style lager in the vein of Corona or Modelo before, so this challenge started with some research. Corn is a key ingredient–but when I stopped by my local shop, they had just sold out of their last flaked corn (everyone else had the same recipe plans, I guess)! So, I took the suggestion to try a cereal mash with corn grits. This contingency plan apparently made all of the difference.

My recipe is based primarily on the Light Mexican Lager recipe in the May/June 2017 issue of Zymurgy (by Amahl Turczyn). The name for this recipe is an homage to the old provincial name for my part of California. It has little link with anything historical, because Alta California ceased to exist before German brewing techniques were widely adopted in Mexico…

This beer is going down as a legendary batch–I had fun brewing it with my dad (we rarely get to brew together because of the distance), and the beer tastes amazing. The cereal mash was a ton of work and substantially lengthened my brew day, but the results were worth it.

IMG_20190402_072248

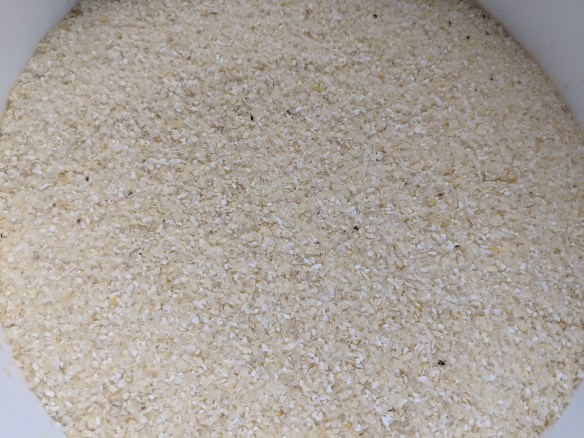
White corn grits, ready to go into the cereal mash

Alta California Lager

  • 5.5 lbs. Barke pilsner malt (Weyermann)
  • 2 lbs. white corn grits
  • 1.5 lb. Vienna malt (Great Western)
  • 4 oz. rice hulls
  • 0.35 oz. Magnum hop pellets (13.2% alpha), 60 minute boil
  • 1 Whirlfloc tablet, 10 minute boil
  • 1 tsp. Fermax, 10 minute boil
  • 1 oz. Saaz hop pellets (3.5% alpha), 5 minute boil
  • 1 pkg. WLP940 Mexican Lager yeast (White Labs), prepared in 1.75 L starter

Target Parameters

  • 60 minute infusion mash with cereal mash, 152°, batch sparge
  • 1.055 o.g., 1.012 f.g., 5.7% abv, 44 IBU, 8 SRM
  • “Mexican lager water”, built from ~8.5 gallons of RO water with 1.5 g of calcium chloride, to hit ~13 ppm Ca and 23 ppm Cl, -9 RA

Procedure

  • This was a complicated brew session! Lots of moving parts, all happening at roughly the same time.
  • A few days in advance, I made a 1.75L starter, letting it ferment out and then cold-crashing. The supernate was decanted off before pitching.
  • My cereal mash procedure followed recommendations from Milk The Funk. I combined 0.5 lb. of the pilsner malt with the 2 lb. of white corn grits, adding water until things were at the right consistency. This was around a gallon of RO water. I added water until the grains approximated a “thin gruel” consistency, and held it at 158° for 5 minutes. Then, I heated the cereal mash to a boil, stirring constantly for 30 minutes. We added water as needed to keep it from getting too thick.
  • As the cereal mash was nearing its end, we started the main mash, using 3 gallons of RO water with ~0.5 g of CaCl, heated to 138°. We hit a mash temperature (for just the barley, exclusive of the barley and corn in the cereal mash) of 133°. I added 6 mL of 88% lactic acid, and then added in the near-boiling cereal mash. This brought the temperature up to 145°. I added another 0.5 gallon of water at near boiling to hit around 148.5°.
  • After 75 minutes, the mash was down to 143°. I added 1 gallon of water at 200° to bring the mash up to 149°. I let this sit for 15 more minutes, and then used an iodine test to check for conversion. Success! The mash was converted completely.
  • I collected the first runnings, and then added 4.5 gallons of RO water with 1 g of CaCl, to raise the mash up to 160°. After 10 minutes, I vorlaufed and collected the second runnings.
  • In total, we collected 7.1 gallons of runnings, with a gravity of 1.037. This equates to 79% mash efficiency!
  • Because my gravity was a little low and my volume a little high, I boiled the runnings for 20 minutes before adding the hops. This was followed by a 60 minute boil, adding the various ingredients per the recipe. Towards the end of the boil, the gravity was up to 1.048, a little higher than I wanted. So, I added 0.25 gallon of RO water for adjustment.
  • After the full 80 minutes of boiling, I chilled the wort down to ~80° and transferred to the fermenter. I chilled it down further to 50° before oxygenating (30 seconds) and pitching the yeast.
  • I brewed this beer on 2 April 2019, starting with a 50° fermentation temperature as mentioned above. On 3 April, I raised the temperature to 53°. On 9 April, I raised the temperature to 60°, because I wanted to kick this through quickly.
  • I raised the temperature to 62° on 12 April, and 67° on 14 April.
  • Final gravity was 1.010, which equates to 4.6% abv. I cold crashed to 33° on 16 April 2019.
  • I kegged the beer using a closed transfer on 24 April 2019. This was done to reduce oxygen pick-up and keep the beer fresher for longer.
  • I force-carbonated the beer,noted that it had dropped pretty clear within about 2 weeks, and crystal clear within about 3 weeks. By the time of my tasting (~4 weeks after kegging), this beer was brilliant!

IMG_20190514_161406

Tasting

  • Aroma
    • Clean, slight hint of corn, a little bit of hop spiciness
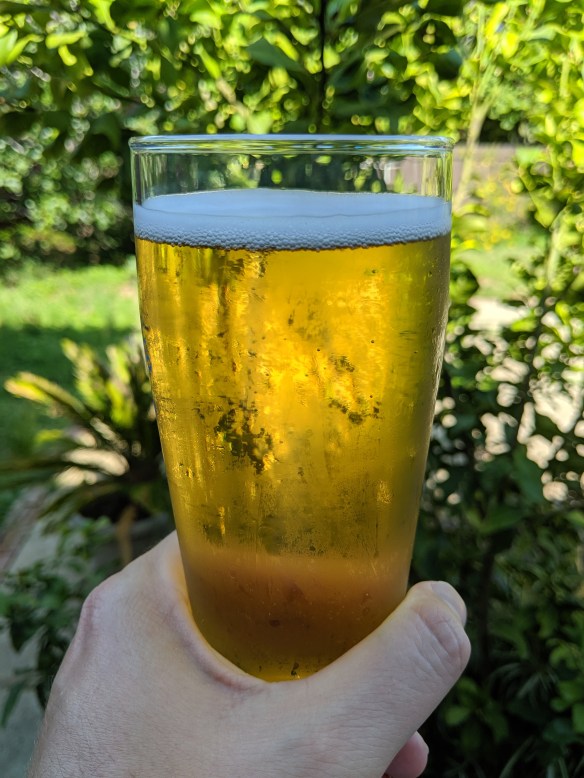
  • Appearance
    • Brilliantly clear, light gold in color. The tall white head settles down to a rim around the glass as the beer is consumed
  • Flavor
    • Crisp and clean; the grainy malt has a hint of corn behind it, and that is backed up by an assertive but not overwhelming hop bitterness. The finish is tilted towards the bitter end versus the malty end, but not overly so.
  • Mouthfeel
    • Off-dry, moderately high carbonation, smooth finish
  • Would I brew this again?
    • This is (modestly speaking) an amazing beer! I’m incredibly impressed by how this one rounded out. It’s eminently drinkable, and ridiculously beautiful in appearance. When I brought it to my brew club meeting, several people thought that I had thrown a commercial ringer into the mix! I’ve never had a lager clear so completely and so quickly. I suspect it’s a combination of the yeast strain and cereal mash–next time I brew this recipe, I won’t be making any changes or taking any shortcuts!
  • Overall
    • 10/10

Lithographica Pilsner

Hobbies have a way of sneaking up on you. My homebrewing started in earnest nearly eight years ago, when I bought some basic equipment and ingredients for a red ale. For the next few years, things chugged along with various recipes–all extract-based, and some pretty decent. Then I moved into a larger place with a dedicated garage and utility sink, and before I knew it I was expanding to full volume boils and all-grain batches. Add in temperature-controlled fermentation and a kegging setup, and things have really taken a turn for the serious.

When I started brewing, each of those subsequent technique and equipment additions were unimaginable. I didn’t have space for many things, and it was taking a good bit of energy to keep on top of the very basics of sanitation, wort chilling, and bottling. Techniques like all-grain brewing seemed like way too much hassle for my time and available facilities. Then, I got practiced, and I got space. As the basics started to become second nature, they also got a little mundane. I wanted some spice in my brewing life, and suddenly all-grain brewing didn’t seem so intimidating after all. I added all-grain brewing to my tool-kit, and have spent more than two years learning and perfecting that. Many aspects of the process are second nature now…which means I’m in a headspace where I can think about adding even more tools to my brewing toolkit.

And here I am staring down at decoction mashing.

Pilsner Malt

Decoction mashing is a long, intimidating process, and quite frankly unnecessary in many cases. Yet, it is also a deeply traditional part of brewing, and for some malts and some recipes may indeed add a bit of flavor and body not possible with infusion mashes.

I recently decided to do another pilsner, and a Bohemian pilsner seemed like a good match. I researched and designed a recipe, aiming to incorporate authentic Bohemian ingredients wherever possible. It was quite a brew day–nearly eight hours–but worth the experience and hopefully worth the beer.

I chose the name “Lithographica Pilsner” owing to a special connection between paleontology and brewing; more on this in an upcoming post!

Lithographica Pilsner

  • 10 lbs. Floor-Malted Bohemian Pilsner malt (Weyermann)
  • 3 oz. Saaz whole hops (2.7% alpha), 60 minute boil
  • 1 oz. Saaz whole hops (2.7% alpha), 30 minute boil
  • 1 oz. Saaz whole hops (2.7% alpha), 10 minute boil
  • 1 oz. Saaz whole hops (2.7% alpha), 5 minute steep
  • Pilsner Lager Yeast (WLP800, White Labs), prepared in starter
  • 1 Whirlfloc tablet (10 minute boil)
  • 0.5 tsp. yeast nutrient (10 minute boil)

Saaz Hops

Procedure

    • Four days in advance, I prepared a 2.25L yeast starter, with 233 grams of dry malt extract. I ran it for two days until it fermented out, and then cold-crashed it until it could be decanted and pitched.
    • I used two 4.5 gallon volumes of water — 4.5 gallons for the mash, and 4.5 gallons for the sparge. Each 4.5 gallon measure started as distilled water, with 0.5 g of calcium chloride.
Mash during the acid rest.

Mash during the acid rest.

  • I added 11 quarts of water at room temperature, to hit the dough-in temperature of 72°. I let this sit for 30 minutes, before proceeding to the next step.
  • Next, I added 1.6 gallons of water at 176°, to hit the acid rest temperature of 105°. I let this sit for 10 minutes, and checked the pH. At room temperature, the pH was about 5.8, so it needed to come down slightly. I added phosphoric acid in two 5 mL increments and a final 10 mL dose (20 mL total), to hit a mash pH of 5.1. I remeasured again after 30 minutes, to see the pH had stabilized at 5.3. This mash at this point had a very milky color in the thin portion, likely due to the high amount of starch.
  • Next, I pulled a 1 gallon volume of thick decoction (most of the liquid drained off), and brought it up to 158° over 10 minutes. I let it sit for another 10 minutes, and then brought it up to a boil while stirring constantly. After a 5 minute boil, I added the decoction back to the mash. This raised the mash temperature to 122.4, a little below my target protein rest of 124°. Owing to this lower mash temperature (due to thermal loss in the mash tun), I increased the volume for the next decoction.
  • Decoction in ProgressI pulled another thick decoction (2 gallons), brought it up to 160°, let it sit for 10 minutes, and then brought it up to a boil. After 5 minutes of boiling, I added this back into the mash.
  • The mash temperature was raised up to 145°, well below my target mash temperature of 154°. So, I added 0.4 gallons of boiling water, which raised the mash temperature to 149°. I then added another 0.4 gallons of boiling water, to raise the mash to 152°. This happened over the course of 20 minutes.
  • After 1 hour, I did an iodine test, and saw full conversion.
  • I pull a third, thin decoction (basically, just mash runnings) of 4.5 quarts, and brought it to a boil for 5 minutes. I added this back to the mash, which raised it to 162°.
  • I stirred, let it sit, and pulled the first runnings. I then added 4.5 gallons of water at 180°, which brought the mash temperature to 170°. I let it sit for 10 minutes, vorlaufed, and collected the second runnings (a portion was left in the mash tun).
  • All told, I collected 7.6 gallons of wort with a preboil gravity of 1.042–84% mash efficiency!
  • After bringing the wort to a boil, I boiled for 90 minutes. Hops, Whirlfloc, and yeast nutrient were added per the schedule in the recipe.
  • After the 90 minute boil, I added the final hop addition and chilled the wort down to 85°. My ground water is fairly warm now, and I had to chill the wort down to pitching temperature overnight anyhow, so I turned off the chiller and transferred the wort to my fermenter.
  • 5 gallons of wort went into the fermenter, with a starting gravity of 1.053.
  • I let the wort sit overnight in my fermentation chamber, to bring it down to pitching temperature. Due to the positioning of the temperature probe, the wort itself only got down to around 65°. It wasn’t ideal, but it was close enough to my pitching temperature (and I didn’t want to let the wort sit any longer). So, I pitched the yeast culture after decanting most of the spent wort. The wort was down to the target temperature within a few hours.
  • This beer was brewed on Thursday, June 2, 2016, and the yeast was pitched on the morning of Friday, June 3, 2016. Subtle signs of fermentation were visible by that evening, and a nice krausen had developed by the following morning (~24 hours later).
  • The fermentation chamber is set for 54°, and I’ll be following the Quick Lager schedule publicized by Brülosophy. At the moment, my plan is to:
    • Ferment at 54° for five days, and check the gravity. If I have passed 50% attenuation, I’ll move on to the next step.
    • Next, raise the temperature to 66° for a week or so.
    • Next, crash the temperature to 34°. When the temperature passes below 50°, I will add gelatin for fining.
    • After 48 hours, I will keg and carbonate, while lagering at around 34°.
  • When I checked the gravity on 7 June 2016, the beer was at 1.028, around 46% apparent attenuation. So, it needs to ferment out a few more days. The temperature was raised up to 66° on 11 June 2016.

What Did I Learn So Far?

  1. Decoction mashing is easier than I thought. This is not to say it is easy necessarily–it’s a lot of work, and adds time, but nothing about the process was really outside my comfort zone or ability. I won’t be doing it for every batch, but I’ll definitely be trying it again.
  2. Decoction mashing is a bit exhausting. It’s a lot of time stirring over a hot kettle, and you really do have to stir continuously. My arm was sore. But, it was worth it!
  3. Temperature targets are hard to hit exactly. I did find–as I had read elsewhere–that I ended up a few degrees shy of my targeted temperatures later in the process. This is probably due to thermal loss in the overall mash. So, I will have to adjust my calculations and take a larger decoction volume for each step. Lesson learned, and easy enough to incorporate next time I decoct!