Beer Tasting: Clonal Common

With a little over a month in the keg, it’s time to test out the Clonal Common! The recipe is intended as a clone of Anchor Steam, in the California Common (steam beer) style. For the sake of comparison, we also picked up a 6-pack of commercial Anchor Steam beer.

Clonal Common

  • The Basics
    • Original gravity = 1.049; final gravity = 1.012; abv = 4.8%; estimated IBU = 35
  • Aroma
    • A sharp woody/minty aroma is prominent (I can only assume this is from the Northern Brewer hops), but not overwhelming. I also pick up a caramel malt aroma in the background. Overall, a clean and pleasant aroma.
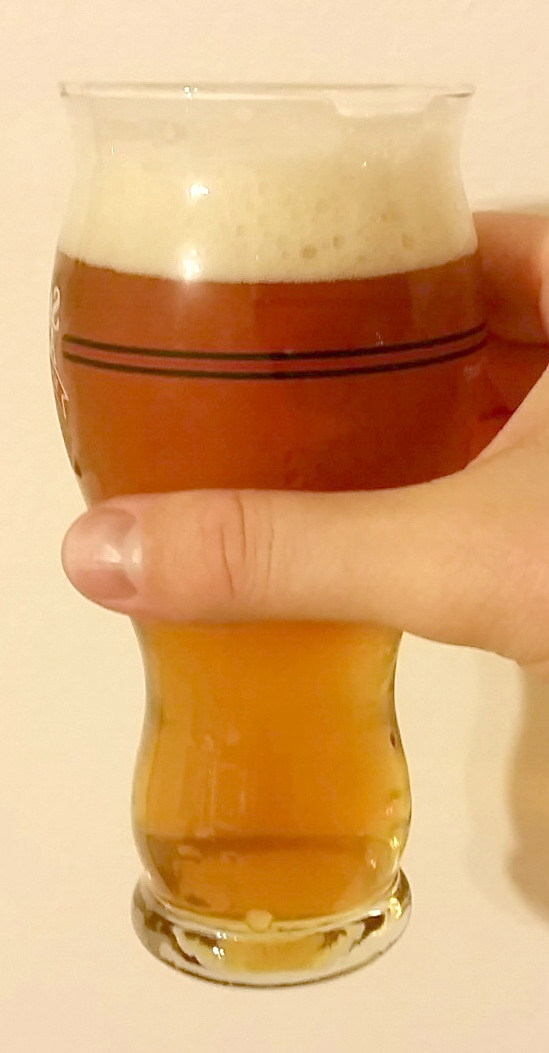
  • Appearance
    • Very clear, but not quite bright, with a medium-gold color. The off-white head is moderately fine and prominent when poured, and sticks around for awhile.
  • Flavor
    • The flavor is nicely balanced between the hops and malt–both have a light and pleasant touch. The bitterness is there, but not over the top. The malt character is a combination of caramel with a bit of toastiness faintly at the rear. There is a very light apple/pear fruitiness on the finish, which is pretty pleasant.
  • Mouthfeel
    • This is a beer with medium-light body, moderate carbonation, and a medium-dry finish.
  • Would I brew this again?
    • As this beer has matured, it has turned into a very quaffable drink. I wouldn’t say this is my favorite style of all time, but it definitely is a very solid recipe and one that I’ll brew again. There’s not much I’d really change on this.
  • Overall score: 7 / 10


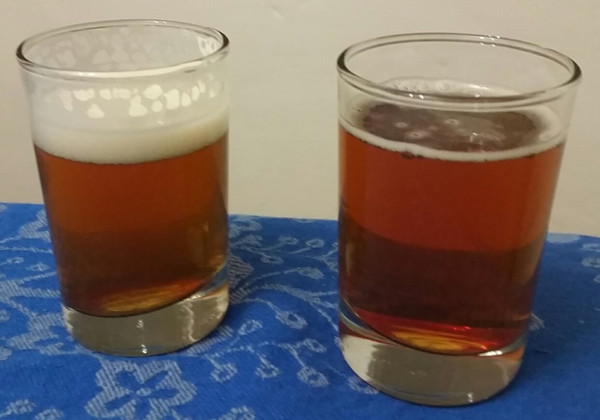
Beer vs. Beer (homebrew on left, commercial version on right)

Anchor Steam

  • The Basics
    • abv = 4.9%; additional data not available
  • Aroma
    • Malty with a caramel-forward note; some fruity esters in the background. No noticeable hops to my nose.
  • Appearance
    • The head is low and moderately-fine, with an off-white color. Head retention is reasonably good. The beer itself is a light amber or medium gold color.
  • Flavor
    • Prominent caramel malt flavor, almost butterscotch-like. The bitterness is subdued and most evident on the finish, rather than being hops-forward. The hops finish is slightly woody.
  • Mouthfeel
    • Medium-light body, with moderately high carbonation. Moderately dry finish.
  • General comments
    • A good beer, and I suppose the epitome of the California Common style, but I like mine a bit better, in terms of its more subdued malt. Both my wife and I agreed that my homebrewed version was more to our tastes. The commercial version was just a little too fruity and cloying.
  • Overall score
    • 6 / 10
Overall Comparisons
The commercial Anchor Steam has a far more prominent caramel aroma and flavor than my homebrew version, which is slightly more prominent in the hops and toastiness of the malt. Anchor Steam itself is slightly more carbonated, too. However, the body, color, and abv match up quite closely. In all, I like my clone quite a bit (and actually prefer it), even if it’s very definitely a different beer from the commercial product. I suspect the differences come down to process and ingredients. This has been a fun exploration of a beer style–I’ll have to try one of these side-by-side comparisons again with another style!

Pannotia White IPA 1.5

In my quest to achieve a perfect white IPA, I’ve modified my previous recipe just a touch (based on my tasting evaluation). I brewed this up a few weeks ago, but only just now got a chance to post it. Here are the details!

Pannotia White IPA 1.5

  • 4 lbs. 2-row malt
  • 3.5 lbs. Pilsner malt
  • 3 lbs. white wheat malt
  • 1 lb. flaked wheat
  • 0.5 lb. flaked oats
  • 0.5 lb. rice hulls
  • 1 oz. Cascade whole hops (assumed 5.5% alpha, first wort hopping, boil 60 minutes)
  • 1 oz. Cascade whole hops (assumed 5.5% alpha, boil 30 minutes)
  • 3 oz. Citra hops pellets (12% alpha, steep 5 minutes)
  • 1 oz. Citra hops pellets (12% alpha, dry hop in keg)
  • 1 oz. Australian Galaxy hops pellets (13.7% alpha, dry hop in keg)
  • 1 oz. Mosaic hops pellets (12.8% alpha, dry hop in keg)
  • 8.1 g gypsum (added to boil)
  • 1 pkg. Belgian Wit Ale yeast (WLP400), prepared in 1L starter)
Procedure
  • I mashed in the grains with 4.75 gallons of water at 164.5°. The mash stabilized at ~153°, and was down to 152° after 30 minutes. After 65 minutes, I added 0.75 gallons of water at 180°. From this, I vorlaufed and collected the wort (adding the first ounce of Cascade hops at this time). Then, I added 3.75 gallons of water at 185°, and mixed to reach 169°. Then, I vorlaufed and collected the remainder of the wort.
  • All told, I collected 7.5 gallons of wort at a gravity of 1.043. This equates to an efficiency of 71%. I added 1 oz. of gypsum to the wort prior to boiling.
  • After 30 minutes of boiling, I added the second ounce of Cascade hops.
  • For the final minute of the boil, I added the orange peel and coriander seed.
  • At flame-out, I added 3 oz. of Citra hops pellets as well as the final ounce of Cascade hops. These were steeped while I cooled the wort using my wort chiller. Once the wort was cooled to 80°, I transferred it to the fermenter.
  • The starting gravity was 1.053, slightly below my anticipated target (1.059). Next time, I may boil a little longer.
  • I pitched the yeast, and set the fermentation chamber to 70°, and lowered it to 68° after 12 hours. At this point, there was a very vigorous fermentation, which topped out through the airlock. This yeast strain could probably use a blow-off tube next time.
  • The yeast was pitched on October 6, 2015. On October 25, 2015, I kegged the beer and added the dry hops. At this time, I also started carbonating (at room temperature, ~70°)
  • The final gravity was 1.013, which equates to 5.2% abv. The beer has a clean, citrusy taste, and I think should be quite tasty after dry-hopping!

Claremonter Weisse

Wort in the kettle, after souring
and just before the boil

Sour beers don’t do much for me; like most brewing fads, the majority of examples I have tasted are too over the top to be enjoyable for more than half a glass. Occasionally, something grabs my attention–for instance, I experienced a Lichtenhainer at NHC that was absolutely delicious and refreshing. More recently, fellow homebrew club member Jason brought a tasty Berliner Weisse to our club meeting. I was intrigued, but didn’t think souring was for me. I had heard that once you go down that road, you basically have to commit a set of fermentation equipment to sours (to avoid cross-contamination of non-sours). It didn’t seem worth it for a type of beers I don’t plan on brewing frequently. This all changed when I learned that Jason’s Berliner Weisse was made using a technique called kettle souring*.  Basically, everything is soured before the boil–no need to contaminate carboys, hoses, or kegs! Quick, easy, and mostly painless. With some additional information in hand (both from Jason–who also gave me an extra lacto culture–as well as an online presentation via Five Blades Brewing), I set out to give souring a try.

The grist for this is simple, and the techniques (outlined below) are fairly simple too. Although it’s technically a Berliner Weisse, more or less, there are enough American twists that I renamed the beer to reflect its geographic influences. Apologies to my German friends.

*This is a great example of how joining a homebrew club has paid off for me; I’ve tasted all sorts of styles I wouldn’t have otherwise, and have been clued in to new techniques by my friends in the club. I probably never would have made a sour beer if not for my homebrew club!

Claremonter Weisse

  • 2.5 lbs. Pilsner malt
  • 2.5 lbs. white wheat malt
  • 1 oz. Cascade hops (whole), 5 minute boil
  • 1 pkg. Lactobacillus Blend (Omega Labs, OYL-605), prepared in 1L starter
  • 1 pkg. California Ale yeast (WLP001), prepared in 1L starter 8 hours in advance
Procedure
  • On Tuesday, October 20, I prepared a 1L starter at ~1.040 gravity (100 g of extra light DME in 1 L water), and adjusted the pH down to 4.4 using 88% lactic acid. I boiled the starter in a 2L flask, and cooled it down to 100°. Then, I added the Lactobacillus culture and let it propagate for two days.
  • Because this was a fairly small batch, and because I wanted a quick mash with minimal equipment to clean, I followed a brew-in-a-bag protocol for the mash. On Thursday, October 22, I heated 6.85 gallons of water to 154°, and added the grains in a big bag. The mash stabilized at 150°. After 30 minutes, I added a little heat to slowly bring the temperature up to 152°, and let it ride back down slowly until 60 minutes had passed after mash-in. At this point, I raised the temperature to 168°, and let it sit for 10 minutes. In the end, I had 6.1 gallons of wort with a gravity of 1.027. This is 86% efficiency!
  • I added ~3.3 tsp of 88% lactic acid to the wort, to bring the pH down to ~4.5. I added some ice packs to cool the wort to 95° and pitched the bacterial culture. I covered the wort with saran wrap to minimize oxygen. 12 hours later, I turned on a heat pad to help raise temperature a bit, to 85°. I let the Let sit until 2 pm on Saturday, October 24.
  • The pH was down to 3.4 by Saturday afternoon. A thin white pellicle covered the entire surface, and the wort had a slightly cidery aroma. I took the relatively pleasant odor as a good sign.
  • I removed as much of the pellicle as I could, and started a very hard and vigorous boil. After 40 minutes, I added the hops for 5 minutes and then removed them. After a total of 50 minutes on the boil, I turned off the flame and chilled the wort to 78°. I transferred approximately 4 gallons of wort into the fermenter and pitched the yeast.
  • The official starting gravity is 1.032. The yeast was pitched on Saturday, October 24, 2015, and I had signs of fermentation by that evening, with a good krausen by the next afternoon.

Beer Tasting: Packrat Porter

  • The Basics
    • Starting gravity = 1.054; final gravity = 1.017; abv = 5.1%; estimated IBU = 38
  • Aroma
    • Lots of malty aroma, with a grainy and roasty character to it. I don’t pick up much in the way of hops or yeast esters.
  • Appearance
    • The beer is deep brown in gross examination. When held up to the light, a deep ruby tinge is quite apparent, as well as excellent clarity. It’s very pretty! The head is beige, fine, and moderately low, with excellent retention during the course of consumption. 
  • Flavor
    • The beer is malt-forward, with a primarily grainy and chocolate character backed up by roasty notes (in the overall same ballpark as the aroma). The bitterness is moderate and smooth, but not overwhelming.
  • Mouthfeel
    • The beer has a moderate body and a pleasant, fine carbonation with a slightly creamy sensation. The finish is relatively dry and tasty. 
  • Would I brew this again?
    • Yes! For something that was thrown together from odds-and-ends, it turned out exceptionally well. Although I am unlikely to duplicate this exact recipe ever again, I think the overall ‘feel’ is a definite winner. The beer is a solid improvement on my last porter, most probably in my choice of a less attenuative English ale yeast as well as a healthy addition of flaked oats, which added some needed body over the previous recipe. I would note that this probably is best classified as a “hybrid porter”–the starting gravity is a bit higher than conventional for an English porter and the graininess is apparently slightly out of character, but it’s not quite aggressive enough to be an American porter (no ‘burnt’ characteristics and the hops are fairly tame). Ignoring the BJCP, though, it’s a great beer! I would definitely brew a simplified version of the recipe (cut the micro-additions of various grain sample packs), or perhaps even switch it up by using Maris Otter for the base malt.
  • Overall rating
    • 8.5/10