Burning Hills Cacao Stout Update

In the secondary

Today, after 8 days in the primary fermenter, I transferred the stout over to the secondary. Gravity reads 1.026 at 64°, which has a virtually negligible correction factor to 60°…to 1.026. Down from an original gravity of 1.062, this leaves around 4.7% abv at the moment. Assuming that the lactose in the recipe is almost completely unfermentable, I should be pretty close to final gravity with this one, judging by the calculations in BeerSmith.

Based on my tasting at the time of transfer, this is going to be an absolutely delicious stout. It is smooth and creamy, and I was pleasantly surprised to have a mild but distinct cocoa finish pop in a few seconds after each sip. However, it’s also a “big” and hearty beer…I think I’m probably going to stick with almost exclusively 12-oz. bottles for this one. An 18- or 22-oz. pour would be just too filling to enjoy.

This transfer session is also notable as the first time I’ve used my “new” brewing setup in the garage. I finally got some time to swap out the old utility sink (which was covered in grease, old paint, and other grunge) and set up a re-purposed work bench. Just on this first run it is much more convenient than the kitchen counter!

The new brewery location…not in the kitchen.

Burning Hills Cacao Stout

It has been a long time since I brewed up a stout from scratch (four years, to be precise), so it is high time to get back into that game. I’ve done a few just-add-malt-and-water kits, which turned out quite well, but I wanted a bit more of a challenge. I have been looking for something with some body, so a milk stout seemed like just the ticket. And I like chocolate milk, so some cocoa powder came into play too (baker’s chocolate and the like have too much fat to brew well). The whole recipe is named to commemorate the unseasonably dry weather and associated brush fires…because why not?

I am excited to try a few new things with this recipe (which is a modification from several I found on-line). First, I’ve never brewed with lactose before…it is supposed to give body without adding much in the way of fermentables, and the only slightly sweet taste of the powder seems consistent with that. I’ve also never brewed with cocoa powder; given the small amount, I don’t expect a huge chocolaty flavor, but just a hint is what I am aiming for. Finally, I spotted a new dry yeast at my local home brew shop–BRY-97 American West Coast dry yeast from Danstar. Apparently it’s only been out for a year or so, and this is the first time I’ve seen it stocked anywhere. Given the clean flavor profiles of the liquid West Coast Ale yeasts I’ve brewed with before, this seemed like a good match for my beer. If I have success, I might move the BRY-97 into regular rotation when I can get it.

Burning Hills Cacao Stout

  • 1.5 lbs. 80°L crystal malt
  • 0.25 lbs. black (patent) malt
  • 0.25 lbs. chocolate malt
  • 0.25 lbs. roasted barley
  • 6 lbs. dark dry malt extract
  • 1 lb. milk sugar (lactose)
  • 2 oz. Cascade hops (whole)
  • 1 oz. cocoa powder (Hershey’s unsweetened)
  • 0.5 tsp. Irish moss
  • 1 pkg. BRY-97 American West Coast dry yeast (Danstar)

Directions

  • Steep grains in 6 quarts of water at 155-160°, for 45 minutes
  • Sparge grains with 2 quarts of water
  • Top up brew kettle to 4 gallons, bring to a boil. Turn off heat, add dry malt extract. Bring back to boil, add hops.
  • After 45 minutes, add Irish moss. After 55 minutes, add lactose. After 60 minutes, turn off heat and add cocoa powder.
  • Cool wort and transfer to fermenter. Top up to 5 gallons and pitch yeast (already rehydrated per package directions).
  • Starting gravity was 1.060 at 74°, which adjusts to 1.062 at 60°. 

Coopers Stout

Continuing my series of quick-and-dirty brew kits, I brewed up a Coopers Stout last weekend (apparently different from the Coopers Irish Stout that I brewed last year).

The procedure was pretty much the same as the Muntons nut brown ale kit I did recently. Boil 2 pounds of dry amber malt extract in ~0.75 gallons of water, take off the boil and stir in the can of hopped liquid malt extract. This time, to avoid the problems of trying to get it to cool down fast enough for yeast pitching, I put a lid on the brew pot and stuck it in the fridge for a few hours. That evening (Saturday, September 22), I dumped the cooled wort in the primary fermenter, and topped up to 5 gallons of water. The pitching temperature was 80 degrees, and the starting gravity was 1.042 (at pitching temp). This time, I just pitched the yeast that came with the kit, and put the lid on the fermenter.

The fermentation was vigorous! Within a day it was spilling out the fermenter. . .because I had this same issue last year with the Irish stout kit, I wonder if it is not something inherent to the yeast strain. In any case, a week went by and the gravity was down to 1.016 at 60 degrees. So, time to bottle!

I transferred the beer into my bottling bucket, and stirred in 3/4 cup of priming sugar that had been boiled in 2 cups of water. The end result was 7 22-oz. bottles, 7 18-oz. bottles, and 33-12 oz. bottles. Not bad at all! And the taste is pretty good, too (guess the vigorous fermentation isn’t a bad thing in the end). Estimated a.b.v. is 3.7%.

Premium Oatmeal Stout

Ingredients

  • 1 lb. flaked oats
  • 8 oz. roasted barley
  • 12.5 oz. 80° crystal malt
  • 8 oz. chocolate malt
  • 1.5 lbs. amber dry malt extract
  • 6 lbs. traditional dark liquid malt extract
  • 2 oz. American Fuggles hops pellets (bittering)
  • 1 oz. Hallertauer whole hops (aroma)
  • 1 packet Nottingham dry yeast

Unfortunately, I only realized at the last minute that I didn’t have any roasted barley! Luckily, I found this page on how to roast your own. It was pretty easy – I took 12 oz. of pearl barley (straight from the grocery store), and spread them out as a single layer on a cookie sheet. I roasted the barley at 450° for 35 minutes, and it ended up with a nice, black color on the outside with a dark brown inside. The end weight was about 9 or 10 ounces, just the right amount for my recipe.

I steeped the grains in 2.5 gallons of water at 150 degrees for 45 minutes, and then sparged them with a half gallon of water. Once I heated it to a boil, I added the malt extract and bittering hops. After 55 minutes of boiling, I added the aroma hops for a final five minutes.

I chilled the wort, and topped it up with distilled water to around 4.5 gallons. The starting gravity was 1.052, or 7 percent potential. This is a very thick, rich wort – probably on account of the oats. It is almost slippery in feel!

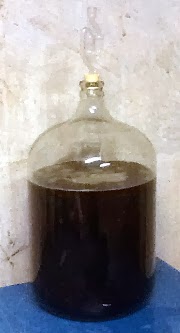
After one week, I transferred the beer from the primary to the secondary. The beer had separated out into layers, with a very sludgy layer in the middle in addition to the usual one at the bottom. I wonder if this was some of the unfermentables from the oats. . .next time, I’ll probably use a kit. I only transferred about 2.5 gallons, and dumped the rest – it was just too sludgy to deal with! The stuff I transferred tasted just fine (in fact, rather good, like a stout should). . .so, I’m not sure what the deal was.

At this point, the gravity was 1.032, or 4 percent potential. After the transfer into the carboy, fermentation picked right back up at a very vigorous rate. I waited another two weeks, and then bottled. The final gravity was 1.020 (2.5 percent potential), meaning I’ve got a brew with 4.5 percent alcohol (right about where I want it). I used a little over 1/3 cup corn sugar for carbonation. Because I had to discard so much during the transfer to the secondary, I ended up with but 18 12-oz. bottles in the end. Hence the name, “Premium Oatmeal Stout.”

At the time of bottling (February 5, 2010), it’s tasting pretty good. A nice toasty flavor and a really beautiful, dark hue. Thus, I’m really looking forward to trying out the carbonated product in a few weeks!