Beer Tasting: Eagle Face Oatmeal Stout

My Eagle Face Oatmeal Stout ended up as another fine brew–it’s been a great winter brewing season so far. I took a sample to my homebrew club meeting last week, and it actually placed highest in our informal beer tasting competition (out of eight entries, many of them quite good)! 

At any rate, I thought I would do my own, self-critical tasting while the beer is still in its prime. The results are below.

  • Basics
    • Starting gravity = 1.057; final gravity = 1.022; abv = 4.6%
  • Aroma
    • Slightly chocolatey / roasty; no hops detectable. Very nice.
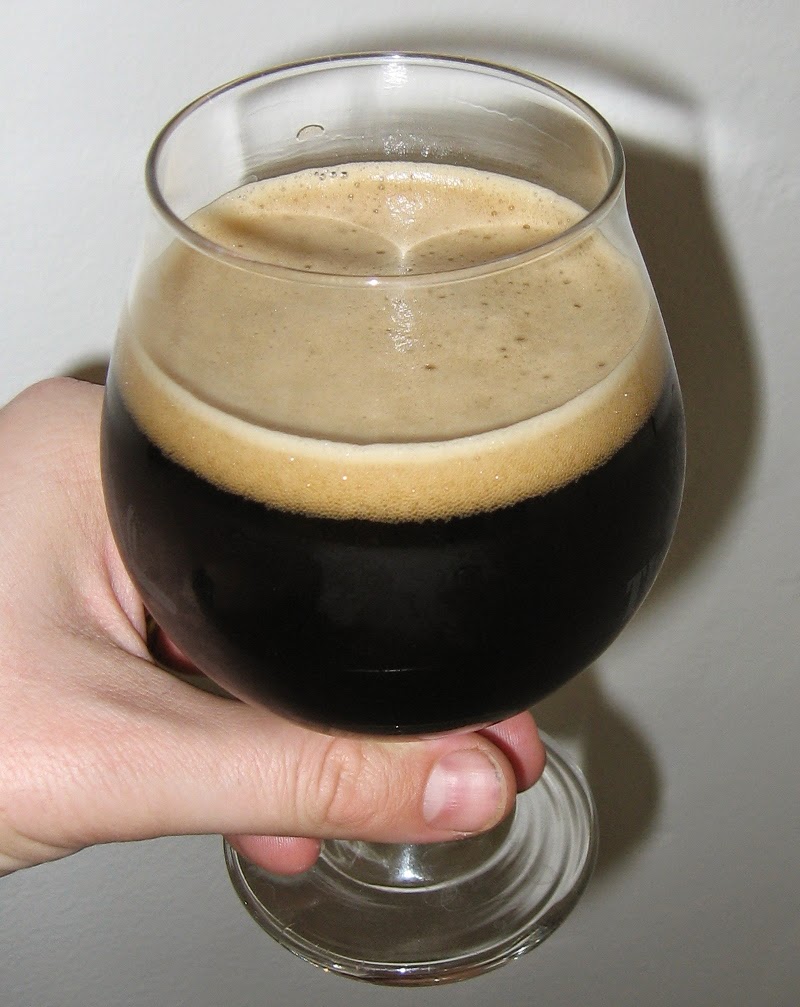
  • Appearance
    • Head retention excellent (in fact, amazing! it keeps going until I finish the glass); light brown head with fine foam and nice lacing on the side of the glass; color of beer is black to dark brown (the latter only in the thinnest part of the glass). Clarity is quite good (at least as can be determined for the color)
  • Flavor
    • Malty and rich; balance between bitterness and maltiness is good; a tad thin on the finish; flavor is primarily coffee and just a light hint of cocoa
  • Mouthfeel
    • Moderate body, carbonation perfect for style; just a touch creamy/silky, but not overly so; no astringency or any off flavors.
  • Would I brew this again?
    • Absolutely! The recipe turned into a really nice beer! I might up the oatmeal on this just a tad next time to give it just a hint more mouthfeel, but otherwise it’s quite good.
  • Overall rating: 9/10

Eagle Face Oatmeal Stout Update

Three and a half weeks after brew day, it was time to take care of the Eagle Face Oatmeal Stout. Over the holiday break, I worked on getting set up for kegging. I converted a 7 cubic foot deep freezer into a “keezer”; I’ll probably detail that in another post, but the short version is that it has a redwood collar made out of 2×4’s, with a three keg (and three faucet) capacity. This oatmeal stout is my first beer kegged in a 5 gallon keg (I’ve done some 5 L mini-kegs using the Philtap system), and was wonderfully easy to package!

The beer was brewed on Saturday, December 13, and was happily fermenting by the next morning. On the evening of December 14, I noticed that temperature of the fermenter had risen to 74°, a few degrees over what is ideal for this strain. Part of the problem was that I had my temperature sensor for the temperature controller hanging in the air, rather than taped to the fermenter. Lesson learned, and I was able to drop the fermenter down to the mid-60s by the next morning. Not ideal, but it seems like the extra conditioning time cleared out any negative flavors.

On January 1, 2015, I pulled the fermenter from the chamber and set it on the floor. This was in the midst of a cold snap, so the whole setup was soon down to the ambient temperature of 52°. The temperature increased a little bit over the next few days, to 60° or so, but didn’t exceed that.

In terms of overall character, the English Ale Yeast (White Labs WLP002) was fast-acting and extremely flocculant. In other words, true to the strain. This was coupled with relatively low attenuation (see below), as expected.

On January 7, 2015, I kegged the beer. Final gravity was 1.022, down from 1.057. This works out to 4.6% abv and 60% apparent attenuation. The beer was slightly sweet (as expected for the yeast strain), with a nice background bitterness and just a subtle fruity aroma. If I do this recipe again, it would be interesting to try another strain to see what a drier version of the beer is like. I transferred 5 gallons (virtually all of the beer in the fermenter) into a refurbished cornie keg.

After kegging, I put the keg in the keezer, which is set for 42°. Following suggestions for force carbonation from Midwest Brewing, I set the CO2 pressure to 40 psi. I’ll do this for 24 hours, lower to 20 psi for another 24 hours, lower to ~13.5 psi, and then sample. Thus, I should be ready for at least preliminary sampling by the weekend!

Eagle Face Oatmeal Stout

This past week, some colleagues and I named a new dinosaur – Aquilops americanus. The name Aquilops means “eagle face”, in honor of the animal’s eagle-like beak. So, it only seemed appropriate to name this weekend’s brew session Eagle Face Oatmeal Stout.

It has been a loooooong time since I have brewed an oatmeal stout. The last effort, back in 2010 during my extract days, was not a flawless fermentation but the end result was really darned good beer (just not a lot of it). My first attempt at an all-grain oatmeal stout is thus experimental territory!

Eagle Face Oatmeal Stout

  • 8.5 lbs. 2-row pale malt
  • 1 lb. 80° L crystal malt
  • 1 lb. Victory malt
  • 1 lb. flaked oats
  • 0.75 lb. chocolate malt
  • 0.5 lb. roasted barley
  • 0.5 lb. rice hulls
  • 1.25 oz. Northern Brewer hops pellets (8.5% alpha, 4.0% beta; adjusted for aging)
  • 1 tbs. 5.2 pH stabilizer
  • 1 tsp. Irish moss
  • English Ale yeast – WLP002
Procedure
  • On Thursday, December 11, I set up the yeast starter. As with my last starter, I used 172 grams of extra light dry malt extract in 1.5 L of water. This was boiled for 10 minutes, cooled, and then the yeast was pitched. True to the reputation of WLP002, it is indeed a highly floculant, fast-acting strain.
  • On brew day, Saturday, December 13, I milled all of the grains except the flaked oats and rice hulls. After milling, the oats and rice were added to the grains, which were in turn added to the mash tun.
  • I mashed in with 4.25 gallons of water at 176°. The overall mash stabilized at 156°.
  • After 60 minutes, I added 0.5 gallons of water at 180°. I let the mash settle for 10 minutes, vorlaufed, and collected 3.25 gallons of wort.
  • I then added 3.14 gallons of 185° water; the temperature of the resulting mash was a little too hot for my tastes (~174°), so I added 0.375 gallons of tap cold water. This brought the mash down to 166° or so. As before, I waited 10 minutes, vorlaufed, and drained the tun.
  • In total, I collected 6.85 gallons of wort with a gravity of 1.048. This works out to ~74% efficiency.
  • I brought the wort to a boil, and added the hops. After 45 minutes, I added 1 tsp. of Irish moss. After 60 minutes, I turned off the heat and chilled the wort down to ~70°.
  • I transferred 5.75 gallons of wort into the fermenter, pitched the yeast, and put it in my fermentation chamber. The temperature was set to 68°. [because it is fairly cool this time of year, I have a small heating pad to help keep temperature up; what a reverse from the summer months!]
  • The starting gravity was 1.057 at 60°. The wort is sweet and quite dark–true to style!
  • When I checked on the beer nine hours after pitching the yeast, fermentation was cruising along quite nicely.

Premium Oatmeal Stout

Ingredients

  • 1 lb. flaked oats
  • 8 oz. roasted barley
  • 12.5 oz. 80° crystal malt
  • 8 oz. chocolate malt
  • 1.5 lbs. amber dry malt extract
  • 6 lbs. traditional dark liquid malt extract
  • 2 oz. American Fuggles hops pellets (bittering)
  • 1 oz. Hallertauer whole hops (aroma)
  • 1 packet Nottingham dry yeast

Unfortunately, I only realized at the last minute that I didn’t have any roasted barley! Luckily, I found this page on how to roast your own. It was pretty easy – I took 12 oz. of pearl barley (straight from the grocery store), and spread them out as a single layer on a cookie sheet. I roasted the barley at 450° for 35 minutes, and it ended up with a nice, black color on the outside with a dark brown inside. The end weight was about 9 or 10 ounces, just the right amount for my recipe.

I steeped the grains in 2.5 gallons of water at 150 degrees for 45 minutes, and then sparged them with a half gallon of water. Once I heated it to a boil, I added the malt extract and bittering hops. After 55 minutes of boiling, I added the aroma hops for a final five minutes.

I chilled the wort, and topped it up with distilled water to around 4.5 gallons. The starting gravity was 1.052, or 7 percent potential. This is a very thick, rich wort – probably on account of the oats. It is almost slippery in feel!

After one week, I transferred the beer from the primary to the secondary. The beer had separated out into layers, with a very sludgy layer in the middle in addition to the usual one at the bottom. I wonder if this was some of the unfermentables from the oats. . .next time, I’ll probably use a kit. I only transferred about 2.5 gallons, and dumped the rest – it was just too sludgy to deal with! The stuff I transferred tasted just fine (in fact, rather good, like a stout should). . .so, I’m not sure what the deal was.

At this point, the gravity was 1.032, or 4 percent potential. After the transfer into the carboy, fermentation picked right back up at a very vigorous rate. I waited another two weeks, and then bottled. The final gravity was 1.020 (2.5 percent potential), meaning I’ve got a brew with 4.5 percent alcohol (right about where I want it). I used a little over 1/3 cup corn sugar for carbonation. Because I had to discard so much during the transfer to the secondary, I ended up with but 18 12-oz. bottles in the end. Hence the name, “Premium Oatmeal Stout.”

At the time of bottling (February 5, 2010), it’s tasting pretty good. A nice toasty flavor and a really beautiful, dark hue. Thus, I’m really looking forward to trying out the carbonated product in a few weeks!