
If you have been following this blog for any length of time, you have probably noticed the new look and the new URL. After nearly eight(!) years at my original home, it was time for a change. All of the content has been migrated, and most new content will be more of the same–recipes, tastings, and the like. However, I also plan to have more frequent essay-style posts, and to use this blog as a workshop for some beer writing projects. Cheers to whatever lies ahead!
Category Archives: miscellaneous
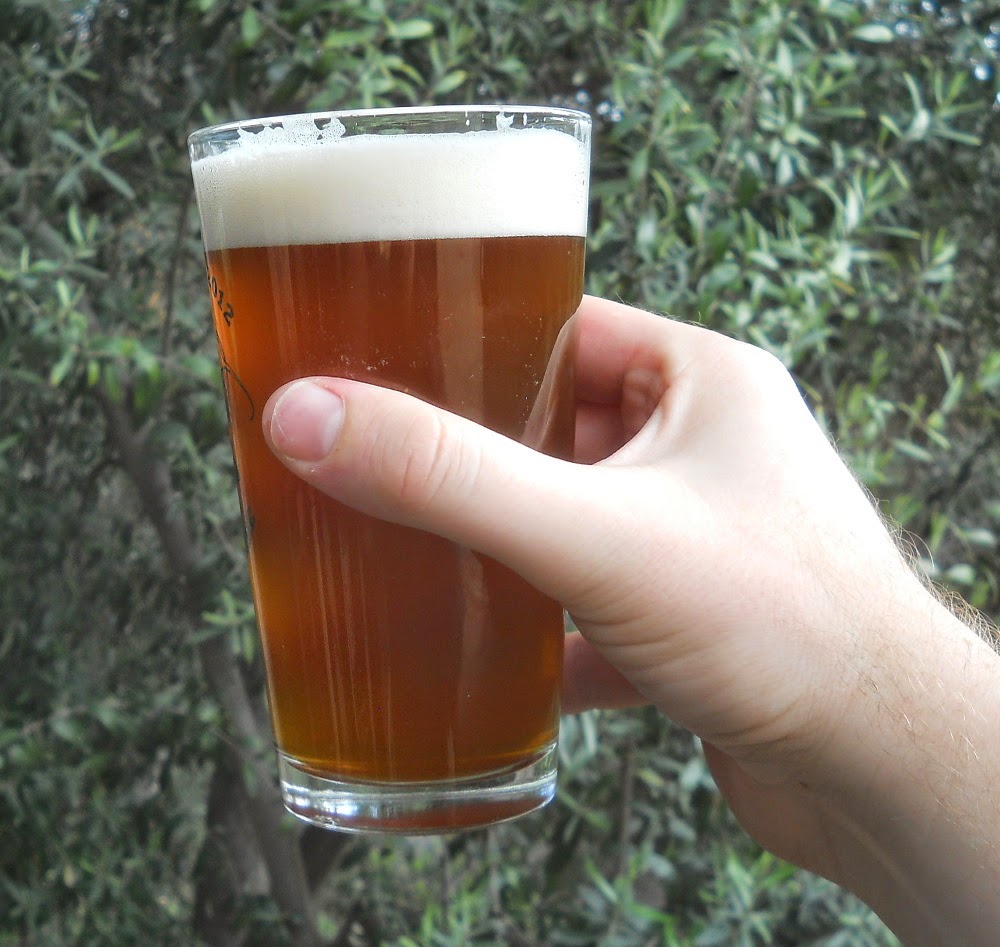
2015’s Homebrew Highlights
 |
| My beer of the year, Citra Blonde Ale |
Looking back, 2015 was a banner year for my brewing. Speaking immodestly, I produced some excellent beers. Just as importantly, if not more so, I really stretched myself in terms of new styles and techniques.
- Favorite Batch
- Citra Blonde Ale
- This blonde ale nailed every single aspect–in fact, I might say it is one of the best beers I’ve brewed over the years.
- Citra Blonde Ale
- Least Favorite Batch
- I didn’t have any batches that totally went south, but I did have some that were just not quite where I wanted them. My Live Long and Porter was squarely mediocre, as was my attempt at an Old Speckled Hen Clone. The former was mostly a result of recipe–the latter was, at least in part, the need to age for way longer than I was willing to give it.
- Experimental Recipe with Most Potential
- Pannotia White IPA
- I’ve done two iterations of this recipe now, and each time have dialed it in just a little closer to my overall goals. One more, and I think I should have it where I want it! This is my “brew to watch” for 2016.
- Pannotia White IPA
- Most Fun New Style/Recipe to Try
- Berliner Weisse
- I’ve long been hesitant to brew a sour beer (and truth be told, I think that sours are a bit overdone), but I couldn’t pass up a chance to try kettle souring. It was super easy, and the result has been pretty tasty!
- Berliner Weisse
- Best Technique Added to Repertoire
- I tried a lot of new things this year (different hopping schedules, session IPA’s, kettle souring, brew-in-a-bag, and oaking, to name a few), but I think the biggest addition to my toolkit has been kegging. I absolutely love the convenience–so much less scrounging, scrubbing, and sanitizing–and it also makes hosting people easier (no more piles of bottles on the counter). I’ll admit that the “cool factor” of a few taps on-hand is nice, too. It’s nice to be able to just have a few ounces if that’s all I want, rather than committing to a full 12, 18, or 22 ounce bottle. A win all around!
- Most Frustrating Technique/Tool to Master
- I would say that mastering my refractometer has been among the most frustrating aspect of brewing this year. It is a handy little tool, but wow, is the scale off major time. It took quite a few iterations and the development of an instrument-specific equation to get it to the point where I feel comfortable with it.
- Best Ingredient Added to Repertoire
- I have to say that WLP400, White Labs’ Belgian Wit yeast, is probably one of the most enjoyable strains to work with, in terms of quality of the results. I’ve used it in both of my White IPA batches, and I’m hooked.
- Favorite Book
- Hands down, it’s Gordon Strong’s Modern Homebrew Recipes. Every single recipe I’ve tried or modified from there has been excellent. It has also helped me to really think about my process, and the effects that process can have on each batch (e.g., late hopping, adding dark grains at the vorlauf, etc.). A close runner-up is Mastering Homebrew by Randy Mosher. Not only is it informative, but it’s got the best (and most helpful) graphics of any homebrew book I’ve seen yet. Strong’s book has pushed my technique the most, but Mosher’s has solidified the basics the most. They are a good duo of publications!
Advice for the New Homebrewer
This post is intended as a “sticky note” for friends, acquaintances, and general internet inhabitants who ask how to get into home brewing. It is based on my own personal experience and opinion. If there is anything that home brewers are, it’s opinionated. So, you may hear drastically different advice on some points (e.g., extract versus all-grain), but I suspect most would at least partly agree on what I have to say here.
My starting assumption here is that the reader is at least passingly familiar with basic terms such as “extract brewing” or “all-grain brewing” or “sparging.” If not, a quick internet search will turn up better definitions than I could provide.
General Advice
- “Relax, Don’t Worry, Have a Home Brew.” I really like Charlie Papazian’s philosophy. Papazian is in many ways a founder of homebrewing culture, and his book “The Complete Joy of Home Brewing” is a legitimate classic. Although I’ve since learned that the corners of some content in the book are a little outdated or have better alternatives, Papazian’s “Relax” mantra is a healthy one to keep in mind. Most minor mistakes in brewing (and even some major ones) won’t completely kill a batch of beer! As I tell friends who are just starting out–“The worst thing that usually can happen is that you will get beer.”
- You will not get Bud Light style lager through 99% of all home brewing efforts. If that is your goal, you are far better off just picking up a case of the cheap stuff at the store. The light American lagers–despite their bad reputation among beer snobs–are technically quite difficult to achieve by most homebrew setups. That said, you are not restricted to just stouts and porters. You can fairly easily make a really tasty blonde ale, for instance–light, refreshing, and quite achievable!
- If your intent is to save money on beer, find another hobby. In terms of raw ingredients for a batch, yes, you might save money in the long run. But once you factor in time and equipment, this is not by any means a money-saving proposition. Quite frankly, there are better ways to save money–like cutting back on your beer drinking.
- You know what your own tastes are. Trust them. If the beer tastes good to you, it’s good beer. That said, do be open to constructive critique from those who have practiced taste buds. As a corollary to that, though, remember that we all pick up on different things in beer. Beware relentlessly negative tasting critiques from beer snobs. There are always those who will find fault no matter what; learn to identify them and (politely) ignore them.
- The goal is not (or isn’t always) high alcohol or maximum hoppage. Those things can be nice in some beers, but get boring after awhile. There is an unfortunate “macho” philosophy prevalent among some home brewers (and even some craft brewers) that the goal is to create the highest alcohol beer that will provide maximum buzz, or the most bitter concoction, or the funkiest Brett brew. This isn’t healthy, nor is it fun, in the long run. Good beer comes in all shapes and sizes; I’ve had great beer with almost no hops character, and lots of hops character. Likewise, I’ve had great beer with 3.2% abv, or 9% abv. Variety is the spice of life.
- There is a tremendous amount of BS masquerading as brewing advice on various internet forums and websites. There is also a tremendous amount of good knowledge out there. As a scientist, I am a little frustrated at times by the uncritical eye cast towards brewing techniques. I get the sense that there is a vast world of scientific knowledge out there, but it doesn’t often percolate down to home brewers. So, use a bit of common sense when incorporating new techniques into your repertoire. As I said in the intro–home brewers are an opinionated bunch, for better or worse.
- Start small. You have no idea if you will give up on brewing after two batches, or if you’ll still be brewing strong ten years down the road. Thus, it doesn’t make a lot of sense to drop $1,000 on equipment right from the start. You should be able to brew your first batch of beer for around or under $100 of equipment and supplies.
- If possible, brew with a friend before committing. If you have a friend who is a homebrewer, ask if you can “ride along” for one of their brewing sessions. It’s a good way to see how the process works. That said, be aware that your friend may have good habits, bad habits, cheap habits, expensive habits, or unnecessary habits built into his or her work flow. Just because they do all-grain with a massively complex sparge setup doesn’t mean that you have to also. Or, if they use iodine-based sanitizers without proper dilution or rinsing, you may want to do something a little different.
- Start with extract brewing. It requires minimal equipment investment as well as requires the easiest technique. It’s a good way to get your feet wet (or end up completely immersed in the hobby!).
- Both extract and all-grain brewing can produce good (or bad) beer. Each technique has its advantages and disadvantages, but with care and experience both can produce excellent beer. If you spend your entire career doing extract, and get excellent results, yay! Don’t let all-grain snobs get you down.
- Take good notes. You will never regret this. What worked in your process? What didn’t work? What did you change from before? What were the starting and finishing gravities? It is hard to improve (or maintain high quality) if you don’t know what happened.
- You will not get perfect beer at first–but you will almost certainly get drinkable beer. As you learn and practice your technique, your brews will nearly certainly improve.
- If the beer tastes funny, wait a week or two or three before tossing it. I’ve made a few batches that improved drastically after a few weeks of maturing. Time doesn’t fix all ills in brewing, but it sure can mitigate most.
Looking Back on the News and Brews of 2014
2014 has seen more changes to my brewery and brewing practice than just about any year since I started brewing. In part, this happened because I feel comfortable enough with the hobby–and that I’ll be brewing for the long-term–to invest in more equipment. This in turn was enabled by a move into a new place that had a garage with utility sink, so I was able to get the operation out of the kitchen (with its various space, sanitation, and process limitations) and into a dedicated brewing area. More space meant more equipment…which meant more options for brewing! As a result, I feel like I have really grown and improved as a brewer. This has been challenging at times–the switch to all-grain was like learning to brew all over again! But, the challenges have been mostly fun and solvable; the best kinds of challenges to have.
 |
| A handy inscription on my mash tun |
Major Changes in Technique / Equipment
- Changing from partial volume to full volume boils. This was a relatively minor change in the grand scheme of things, but it did pave the way for all-grain brewing.
- Transitioning into all-grain brewing. This is perhaps the largest and most enjoyable change. As mentioned above, in many ways it was like learning to brew all over again. New equipment, new things to worry about (or relax about).
- Improved temperature control. This change has allowed me to extend my brewing season, as well as ensure happier yeast during my previous “usual” brewing season (late fall through early spring).
- Yeast starters. Where I had been relying largely on dry yeast, I am excited to expand into some new strains in the world of liquid yeast packaging.
- Beginning the transition into kegging. As I finish out the year, I’ve been building a keezer setup, with anticipated “first draft” in the first week or two of the New Year.
Favorite Brews of 2014
- Bonedigger Brown Ale. This may be the first recipe I’ve ever designed that turned out perfect on first try. I chalk it up to dumb luck, and will definitely put this into regular rotation!
- Gondwana Pale Ale. This one took two iterations, but ended up as a nice showcase for Citra hops (my new favorite hop variety–it will be tough to hold back on overusing this one!).
- Summer Blonde Ale. This ale was my first temperature-controlled brew, and ended up as a quite drinkable warm-weather concoction. This too is going into regular rotation!
Goals for 2015
- Experiment with new ingredients–yeast, hops, and malts. I have worked a lot with “classics” such as crystal malt, basic American and British yeasts (e.g., Nottingham, various Chico strains, etc.), and Cascade hops. In the upcoming year, I would like to expand into some untouched territory.
- Perfect kegging and in-keg carbonation of my homebrew, along with small-scale bottling from the keg. I’m thinking about building a bottling gun, just for fun.
- Develop an in-house white IPA recipe. While I was traveling recently, I got a chance to try an amazing Italian white IPA (Lariano Vergött), and since then have been dreaming about devising one of my own.
- Brew and/or develop more session beer recipes. Pretty much what it says.
- Brew a lager. Now that I have good temperature control, I can start to think about lagers and pilsners. This opens up a whole new world of styles and techniques, of course.
 |
| Summer Blonde Ale |
Homebrew Roll Call (everything I brewed in 2014)
- Peter’s Irish Red Ale
- Burning Hills Cacao Stout
- Laurasia IPA
- Fake Tire Amber Ale 3.0
- Gondwana IPA
- California Vanilla Porter
- El Dorado Amber Ale
- Rodinia IPA
- Summer Blonde Ale
- Gondwana Pale Ale 1.1
- Vaalbara Session IPA
- Edmund Fitzgerald Porter Clone
- Bonedigger Brown Ale
- Andy’s Pumpking Ale 1.0
- Eagle Face Oatmeal Stout
Laurasia IPA
 |
| The new burner and kettle |
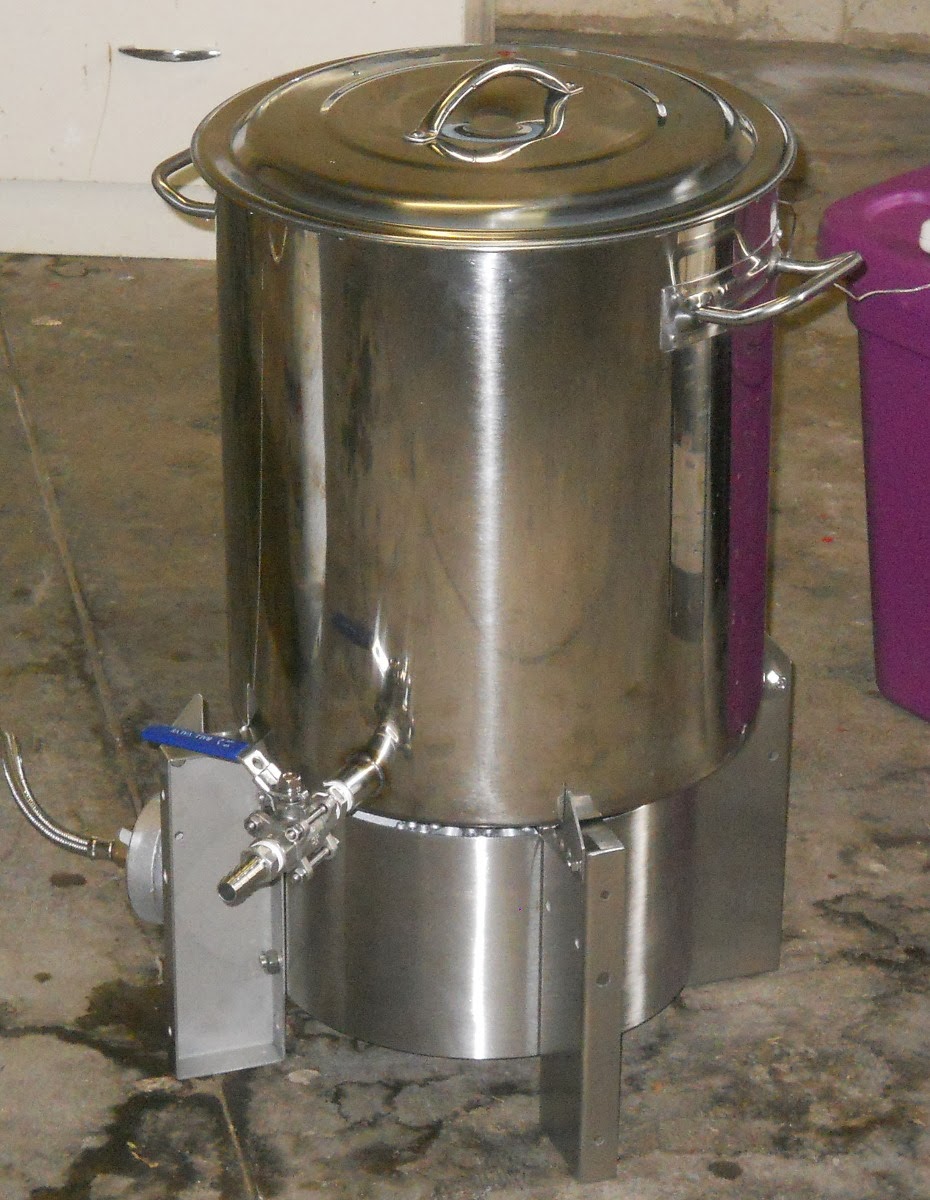
The brewery has been radically reformed over the past few weeks. First was the move into a new (and expanded) brewing space. With that move pretty much completed, I decided it was time to up my brewing game and go full volume boil. Being off the kitchen stove certainly helped in this! I just acquired a new Blichmann floor standing burner–it’s one of the low pressure propane burners, with a maximum output of 72,000 BTUs. Assembly was minimal and simple–perhaps 15 minutes with a wrench. To accompany that, I purchased a 10 gallon stainless steel kettle. As sold at my local homebrew shop, it didn’t have any outlets. But, I was able to have them weld in a threaded coupler. I bought a ball valve and a hose barb, and the setup was complete!
As an inaugural brew, I decided to put together a fairly simple IPA recipe. This is a departure from my previous favorite, the Rainy Day IPA, particularly in having fewer steeping grains. According to some reading, I may have been using more crystal malt than is healthy for an IPA. So, I cut back on that quite a bit (only a half pound now!), and we’ll see what happens.
Laurasia IPA
- 8 oz. 40° crystal malt
- 4 lbs. extra light liquid malt extract
- 5 lbs. light dry malt extract
- 3 oz. whole Cascade hops (bittering)
- 1 oz. whole Cascade hops (aroma)
- 2 oz. Simcoe hope pellets (dry hop)
- 0.5 tsp. Irish moss
- 1 pkg. BRY-97 American West Coast dry yeast (Danstar)
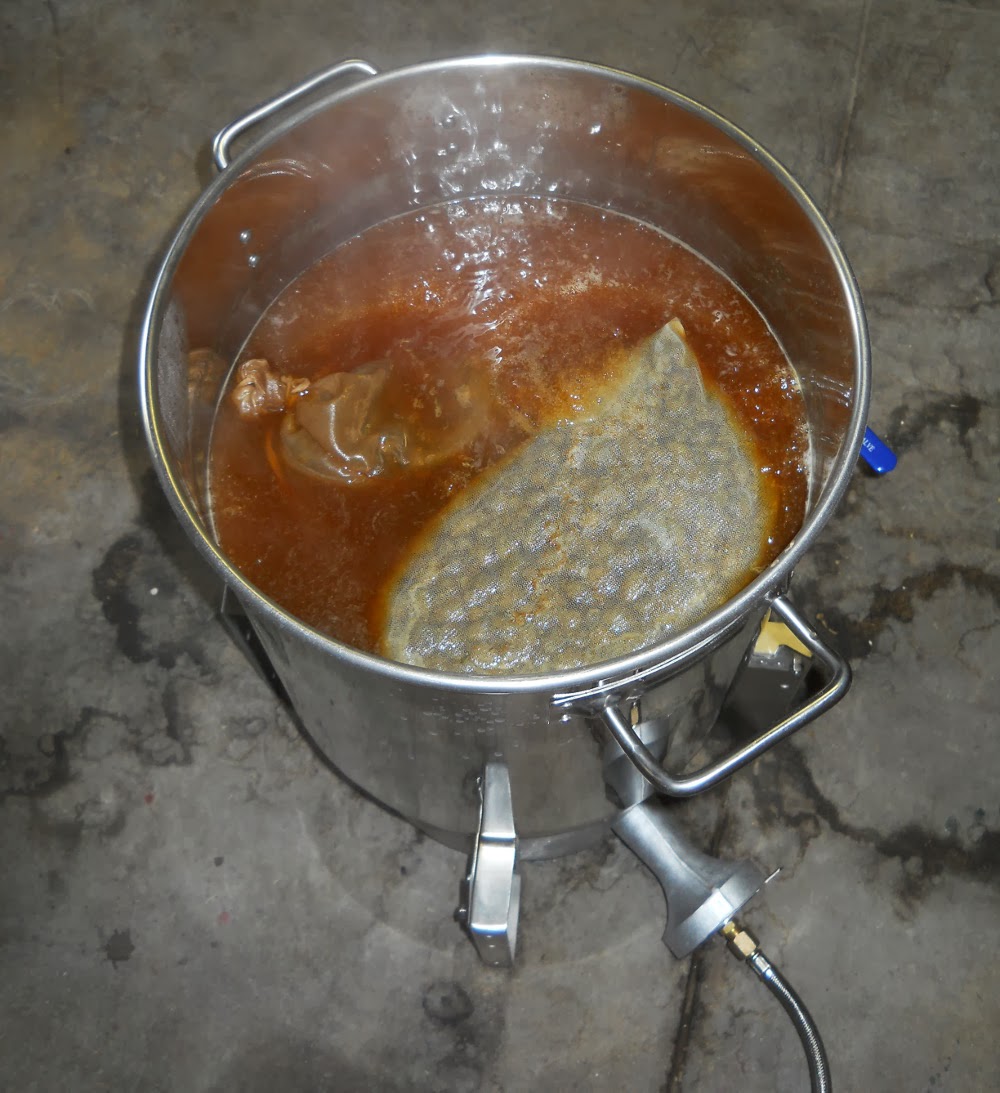 |
| Boiling the Laurasia IPA |
Steps
- Steep crystal malt for 30 minutes in 1 gallon of water at 152° to 156°; sparge with 0.5 gallon of water. Top up to 6 gallons volume total.
- Bring to a boil, turn off heat. Add malt extract and bring back to a boil. Once the wort is boiling, add 3 oz. of Cascade hops.
- After 45 minutes, add Irish moss.
- Boil for a total of 1 hour. At flame-out, add 1 oz. whole Cascade hops (aroma).
- Chill using wort chiller; this took approximately 45 minutes, during which time the aroma hops were steeping. The end temperature was approximately 70°.
- Whirlpool, let sit for 15 minutes, and transfer to the primary fermenter. Pitch the rehydrated yeast, and seal up the fermenter.
- After evaporation loss and trub loss, the recipe resulted in nearly precisely 5 gallons. Gravity was 1.068 at 66°, which translates to 1.069 at 60°. This is nearly a perfect match for the calculations from BeerSmith (1.070)!
- After fermenting for a week, I plan to transfer this over to the secondary fermenter. There it will sit for another week, and I’ll add the Simcoe hops for a week of dry hopping prior to bottling.
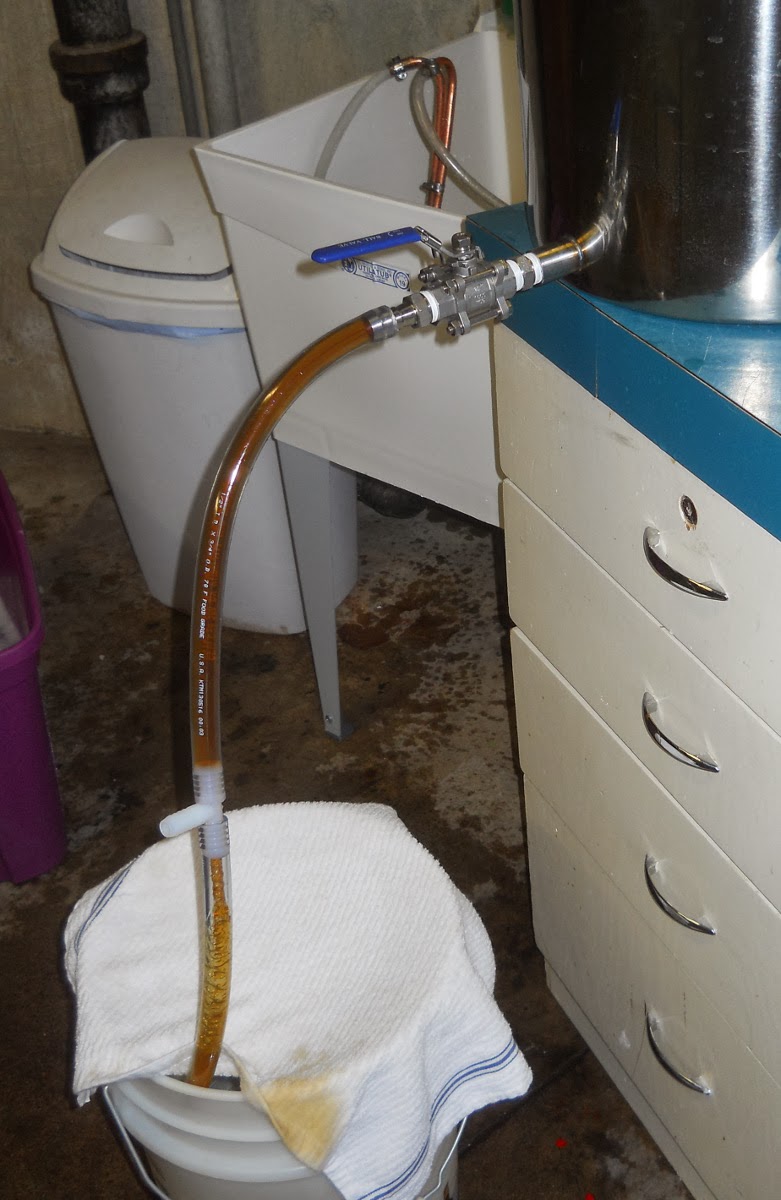 |
| Venturi pump in action |
Miscellaneous Comments
Back when I was doing partial volume boils, I oxygenated my wort by splashing in the water direct from the tap, usually with a spray nozzle. That’s no longer an option (because I no longer need to top up), so I needed to try something different. I wasn’t quite ready to spring for a pump and/or oxygen tank, and fortunately some looking online highlighted a much cheaper (and anecdotally just as effective) solution. It gets the fancy name of a “Venturi pump“, but in practice it’s simply a little nylon plastic t-junction in the middle of the tubing that the cooled wort runs through. This piece cost under $3 at the hardware store. It operates on a simple physical principle…because the junction is of smaller diameter than the rest of the tubing, the pressure in the wort drops as it passes through. Air is sucked in via the protruding side of the “t”, and into the wort.
Contamination was a concern, but the reports online suggest this is only a very minor consideration. I presume that because the yeast is pitched immediately, any potential problems are outcompeted. The other minor quirk is that you want to hold your finger over the opening on the “t” while starting the flow of wort. Once there is a good flow, air is sucked in; if you release too soon, you will lose a bit of wort.
All in all, I was happy with this inaugural brew day for the new equipment. The burner heated the wort to boiling quite quickly–under 20 minutes! The kettle was easy to clean, and it was nice not having to mess with adding water and the like. I am curious to see how the beer tastes!
